Maintaining a clean and sanitized RV freshwater system is crucial for ensuring the safety and enjoyment of your travels. A well-maintained water system provides fresh, clean water for drinking, cooking, and bathing, enhancing your overall RV experience. Here’s a guide to cleaning and sanitizing your RV’s freshwater system.
Step-by-Step Guide to Sanitizing Your RV Fresh Water System
1. Prepare the Necessary Materials
Before you begin, gather all the necessary materials:
– Non-scented bleach (do not use Cleaner Plus Bleach, or bleach powder)
– A measuring cup and funnel
– A clean bucket or water storage container
– A potable water hose
2. Turn Off and Bypass the Water Heater & the Ice Maker, Remove inline water filter
Ensure that the water heater is turned off and bypassed to prevent bleach from entering and damaging the system.
Ensure that the water supply to the ice maker is turned off.
Remove the inline water filter inside the RV.
3. Calculate the Amount of Bleach Needed
The general rule is to use 1 cup of bleach for every 50 gallons of water tank capacity. For example, a 100-gallon tank would require 2 cups of bleach.
4. Create the Bleach Solution
Dilute the calculated amount of bleach in a gallon of water. This will help to evenly distribute the bleach throughout the tank.
5. Fill the Fresh Water Tank
Add the bleach solution to the freshwater tank, then fill the tank with potable water.
Most people do it by pouring it directly into a garden hose, and then connecting the hose to the RV and water faucet and turning on the water.
-Use a small funnel to help pour bleach into the hose.
-If your RV comes with a gravity-fill water port, you can just pour bleach directly into that. Make sure, however, to follow that up with enough water to completely wash the bleach down through the fill pipe.
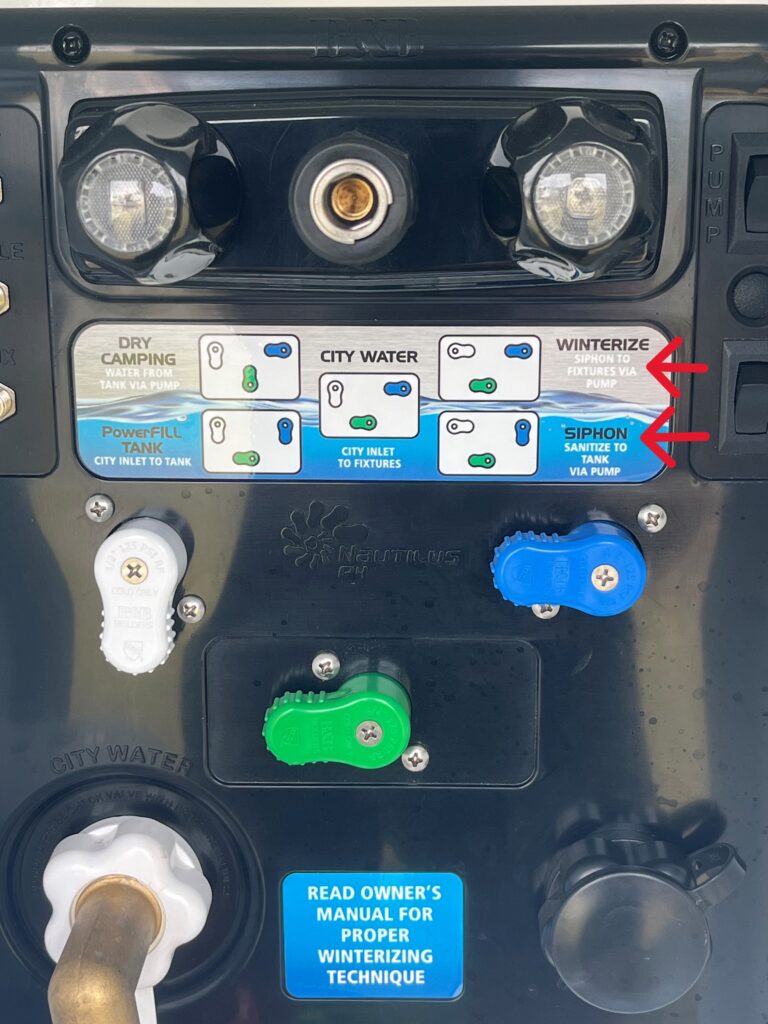
-Many RVs come with a winterizing system and/or tank sanitization siphon system that can suck water from a bucket and pull that into the water tank and water lines. You can certainly use this.

6. Run the Bleach Water Through the System
Turn on the water pump and run the bleach water through all faucets until you smell bleach. This ensures that the solution reaches all parts of the system.
7. Let the Solution Sit
Allow the bleach solution to sit in the system for at least 8 to 12 hours to effectively sanitize the tank and pipes.
8. Drain and Flush the System
After the waiting period, drain the tank and refill it with fresh water. Run fresh water through all faucets until the bleach smell is no longer detectable.
9. Reactivate the Water Heater
Once the system has been thoroughly flushed, you can turn the water heater back on and switch it from bypass mode.
10. Final Checks
Make sure that all faucets are running clear water and that there is no bleach odor present. You may need to repeat the flushing process a few times to completely remove the bleach residue.
Tips for Maintaining a Clean Water System
– Regularly drain and sanitize your freshwater system, especially if your RV has been sitting unused for an extended period.
– Always use a potable water hose when filling your tank to prevent contamination.
– Consider installing a water filtration system to help keep your water clean between sanitizations.
By following these steps, you can ensure that your RV’s freshwater system remains clean and safe for all your adventures on the road.
Remember, a clean water system is key to a healthy and enjoyable RV lifestyle. Safe travels!
If you have any questions, please reach out to mike@lastingmemoriesrv.com

