
RV owners need proper tire maintenance to prevent blowouts and ensure safety on the road. This guide covers essential RV tire care for weekend campers and full-timers alike. You’ll learn correct tire pressure techniques, how to spot dangerous wear patterns during inspections, and smart storage methods to extend your tires’ lifespan. Let’s help you avoid costly replacements and dangerous roadside emergencies with these practical maintenance tips.
Understanding RV Tire Basics
A. Types of RV tires and their specific needs
Ever noticed how RV tires look different from your car tires? That’s because they are!
RV tires come in three main types, and each has its own personality:
- ST (Special Trailer) Tires – These are specifically made for trailers and fifth wheels. They’re built with stiffer sidewalls to handle heavy loads and prevent that annoying sway when you’re cruising down the highway.
- LT (Light Truck) Tires – Found on many Class B and C motorhomes, these tough guys can handle more weight than regular passenger tires while still giving you a decent ride.
- Commercial Tires – The big boys for Class A motorhomes. These heavy-duty tires are designed for serious weight and long hauls.
The wrong tire type on your rig is like wearing flip-flops for a mountain hike – disaster waiting to happen.
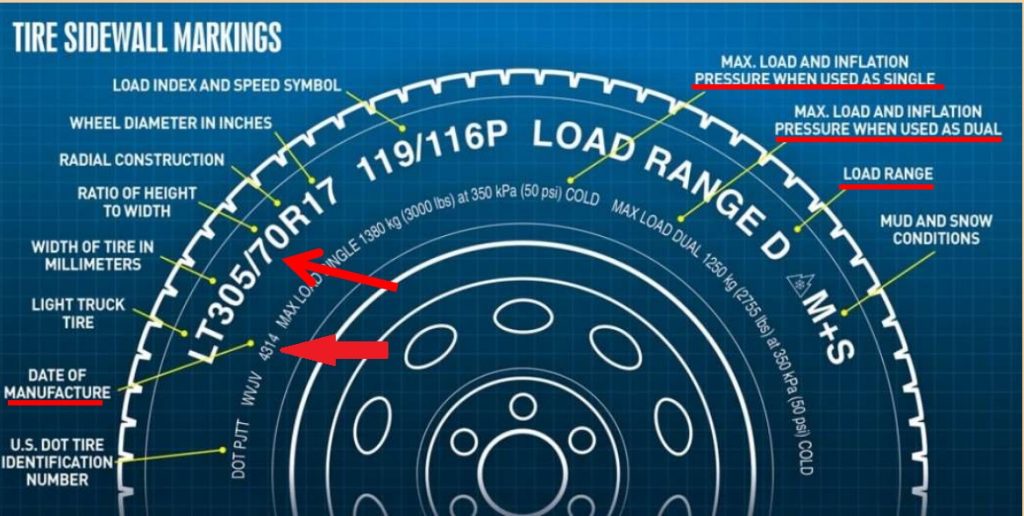
B. Decoding tire specifications for your RV
Those numbers and letters on your sidewall? They’re not just for show.
Take this example: ST225/75R15 Load Range D
Breaking it down:
- ST: Special Trailer tire
- 225: Width in millimeters
- 75: Aspect ratio (sidewall height is 75% of width)
- R: Radial construction
- 15: Fits a 15-inch wheel
- Load Range D: Can handle up to 65 psi and 2,540 pounds
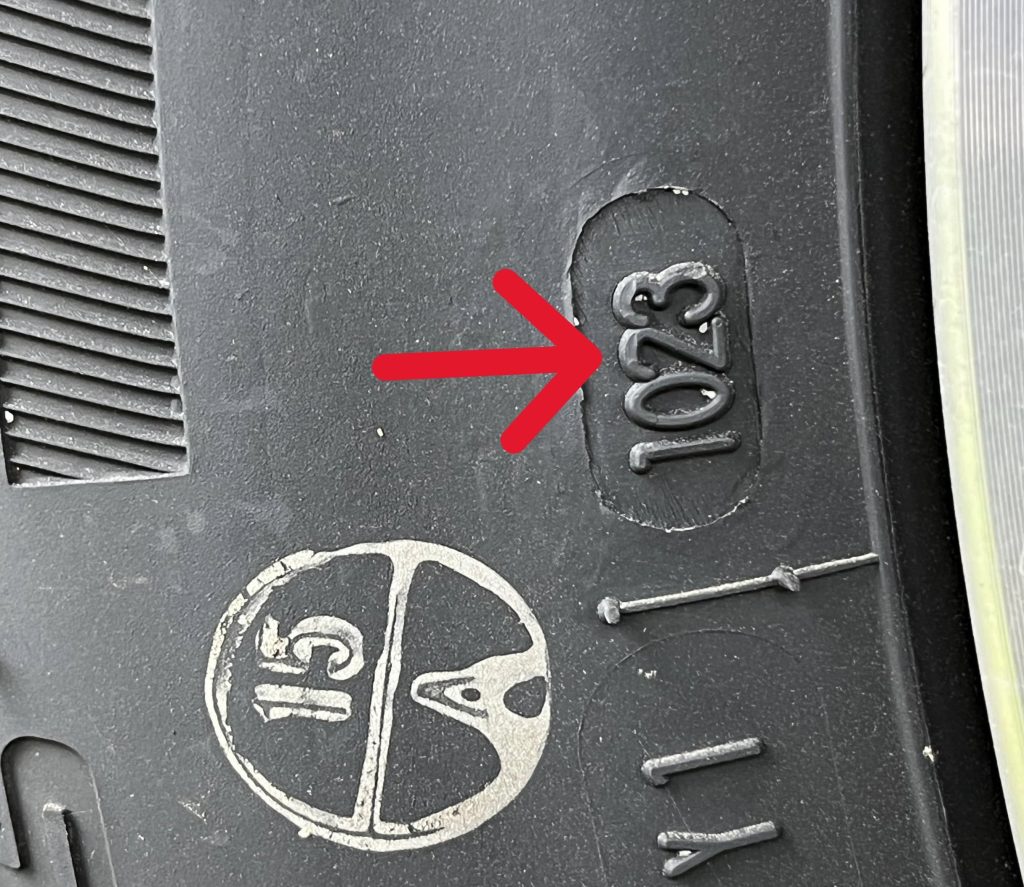
Also check the DOT code – those last four digits tell you when your tire was made (week/year). Anything over 5 years old? Start shopping.
C. How tire quality impacts your travel safety
Your RV tires are literally where the rubber meets the road when it comes to safety.
Premium tires aren’t just about brand snobbery – they genuinely offer:
- Better heat resistance (the #1 killer of RV tires)
- Improved traction in wet conditions
- More consistent wear patterns
- Higher resistance to UV damage
I’ve seen budget tires blow out after just 8,000 miles while quality ones cruise past 30,000. When you’re carrying your home on your back at 65 mph, that difference matters.
The cost difference between budget and premium? About $400-600 for a full set. The cost of a blowout on the interstate? Potentially your life.
Essential Tire Pressure Management
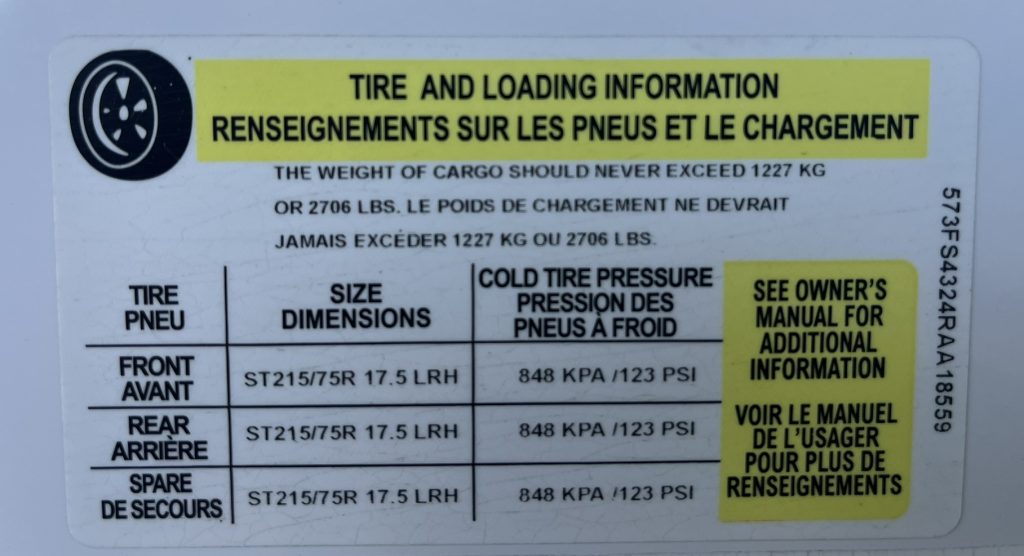
A. Finding the correct pressure for your specific RV
Tire pressure isn’t a one-size-fits-all game for RVs. Your perfect PSI depends on your specific rig and how much weight you’re hauling.
First, check the manufacturer’s label – usually inside the door jamb, fuel door, or owner’s manual. This tells you the baseline pressure for your RV when loaded.
But here’s what many RVers miss: The sidewall PSI on your tires? That’s the maximum pressure when carrying the tire’s maximum load. Not necessarily what your RV needs.
If you’ve modified your rig or carry varying loads, a weigh station visit is your best bet. Get each axle weighed, then check the tire load charts to match your weight to the proper pressure.
B. Best practices for checking pressure
Morning is tire pressure checking time, folks. Before you hit the road, when tires are cold (meaning they haven’t been driven for at least 3 hours).
Why? Because driving even a short distance heats up those tires and increases pressure, giving you false readings.
Make checking pressure part of your pre-trip ritual. Got a long trip planned? Check again after the first 50 miles when everything’s settled in.
Don’t forget to remove those valve stem caps completely and press the gauge straight onto the valve stem. A slight angle can give you inaccurate readings.
C. How temperature affects tire pressure
The weather plays tricks with your tire pressure. For every 10°F change in temperature, your tire pressure changes by about 1-2 PSI.
Cold morning in the mountains? Your pressure drops. Hot afternoon in the desert? It climbs.
This isn’t just nerdy trivia – it’s why RVers blow tires in summer heat. Your perfectly filled tire in the morning can become dangerously overinflated by afternoon.
If you’re traveling between drastically different climates, recheck your pressure after significant temperature changes. That Arizona-to-Colorado trip needs a pressure adjustment when you hit those mountains.
D. Tools for accurate pressure monitoring
Toss that cheapo pencil gauge from the gas station. For RVs, invest in a quality digital pressure gauge that reads up to at least 120 PSI.
The best ones have lighted displays for those early morning checks and angled heads to reach awkward valve stems.
Keep a portable air compressor designed for RV tires. The tiny car compressors won’t cut it for those high-pressure RV needs.
For serious RVers, a dual-head chuck tool makes life easier – one end for checking pressure, the other for filling, without constantly removing and reattaching.
E. Setting up a tire pressure monitoring system (TPMS)
A TPMS is like having a guardian angel watching your tires while you drive.
These systems use sensors on each valve stem to constantly monitor pressure and temperature, alerting you immediately to problems before they become disasters.
Installation is straightforward: Replace your valve caps with the sensors, mount the display near your driving position, and program your pressure thresholds.
Most systems allow setting both high and low-pressure alerts. Set yours about 10% below your cold inflation pressure for the low alert, and 20-25% above for the high alert.
The peace of mind is worth every penny. A $300-500 investment protects your $50,000+ RV and, more importantly, your safety on the road.
Extending Tire Life Through Regular Inspections
Creating a pre-trip inspection checklist
I’ve learned the hard way that a quick 10-minute inspection before hitting the road can save thousands in repairs and countless hours of vacation time. Trust me on this one.
Your pre-trip tire inspection checklist should include:
- Pressure check: Verify all tires match the manufacturer’s recommended PSI (when cold)
- Visual inspection: Look for bulges, cracks, or objects stuck in the tread
- Tread depth: Use a penny test – if you can see Lincoln’s head, your tread is dangerously low
- Valve stems: Check for cracks or leaks
- Lug nuts: Confirm they’re properly torqued
- Age verification: Check the DOT code – replace tires older than 5-7 years regardless of appearance
Keep this checklist on your phone or laminated in your RV. The best part? This small habit prevents 90% of common tire issues before they happen.
Signs of dangerous tire wear and damage
Your tires are literally screaming at you before they fail. You just need to know what to listen for.
Watch for these red flags:
- Sidewall cracks: Small cracks mean UV damage and impending failure
- Uneven wear patterns: Center wear = overinflation; edge wear = underinflation
- Cupping or scalloping: Indicates suspension problems
- Flat spots: Result of hard braking or dragging
- Bulges or blisters: Internal damage that could lead to a catastrophic blowout
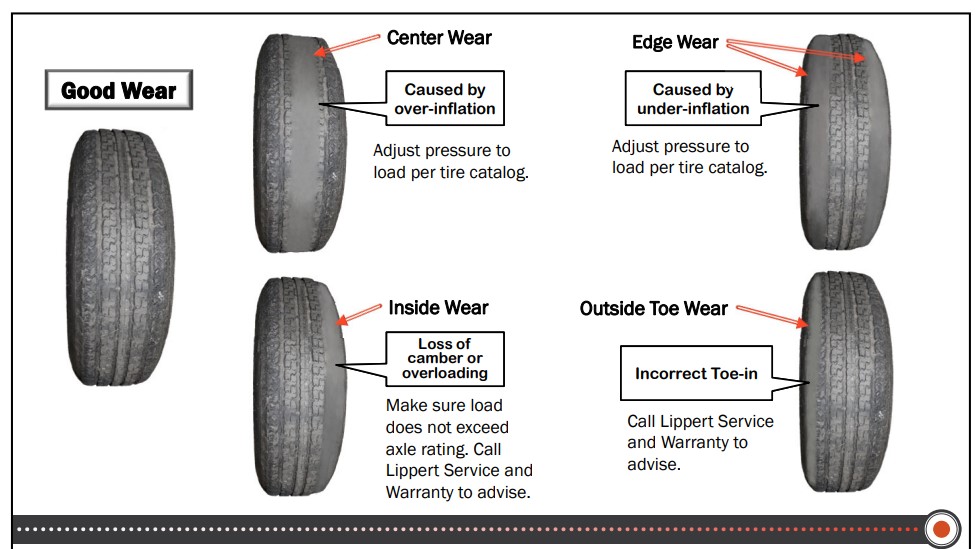
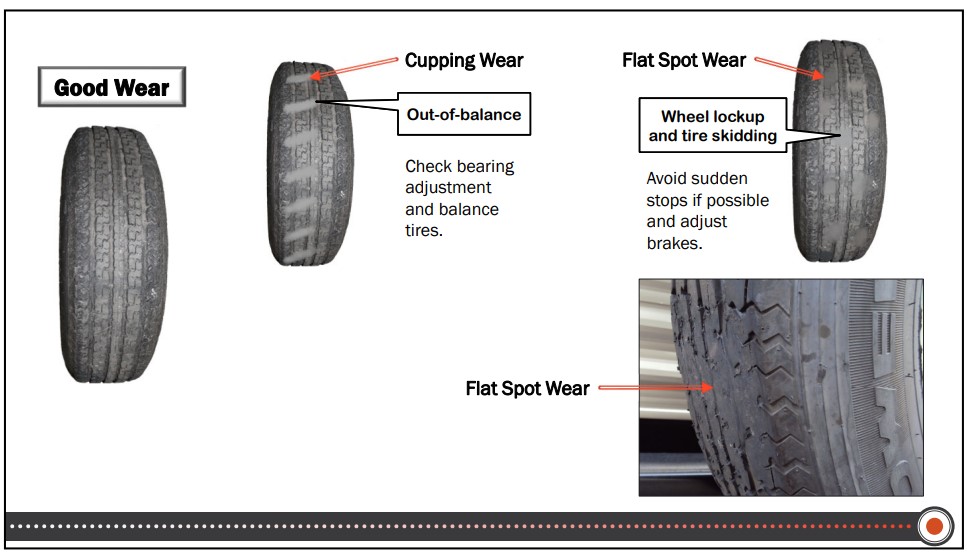
What most RV owners miss? Checking the inside walls of their tires. These hidden surfaces often show damage first, especially on dually setups.
When to rotate your RV tires
The rotation schedule for your RV tires isn’t like your car’s. Ignore this and you’ll be shopping for new rubber way too soon.
For motorhomes, rotate every 6,000-8,000 miles. Fifth wheels and travel trailers? Every 5,000 miles or at least annually.
The rotation pattern depends on your RV type:
- Front engine diesel pushers: Cross the front tires, move rears forward
- Class C motorhomes: Standard X-pattern works best
- Trailers: Side-to-side rotation to ensure even wear
Remember that properly rotated tires last 20-30% longer. That’s thousands of dollars saved over your RV’s lifetime.
Many owners skip rotations because they seem complicated. Just mark your calendar and make it part of your regular maintenance. Your wallet will thank you.
Tire Storage and Protection Strategies
A. Protecting tires from UV damage
Ever noticed how RV tires age even when you’re not racking up miles? Sunlight is the silent killer of rubber. UV rays break down the compounds in your tires, creating those tiny cracks on the sidewall—the first sign your tires are crying for help.
The fix? Pretty simple actually. Quality tire covers are your best friend here. Not the cheap ones that tear after one season. Invest in covers specifically designed for RVs with UV-resistant materials.
If you’re parked somewhere sunny for more than a couple days, those covers need to go on. No excuses. Your tires will thank you by not falling apart prematurely.
And here’s a trick most RVers miss: tire dressings with UV protection. But watch out—some products contain petroleum distillates that actually speed up deterioration. Stick with water-based protectants made specifically for RV tires.
B. Proper jacking and supporting during extended stays
Sitting in one spot for weeks creates flat spots on your tires. Bad news for your next drive.
Want to avoid this headache? Use jack stands or stabilizing blocks under your RV’s frame—not the axles!—during long stays. This takes weight off your tires without warping your RV’s structure.
For fifth wheels and travel trailers, rotate the tires a quarter turn every few weeks if you’re not using stands. Sounds simple, but it makes a huge difference.
C. Winterizing tires for off-season storage
Winter storage destroys tires faster than you’d think. The cold makes rubber contract and lose flexibility.
Before storing:
- Clean tires thoroughly—dirt holds moisture that speeds up degradation
- Inflate to maximum recommended pressure (it’ll drop as temperatures fall)
- Get your RV off the ground with proper stands if storing for more than a month
Most RV owners miss this: chalk blocks touching your tires can cause damage over time. Use them for initial positioning, then switch to frame supports.
D. Using tire covers effectively
Tire covers aren’t just about slapping them on and forgetting them. The trick is getting the right fit. Too loose and they’ll flap around in the wind, potentially causing more harm than good. Too tight and you’ll struggle getting them on and off.
Look for covers with elastic or drawstring edges that create a snug fit. And check them regularly for tears or water pooling.
The real pro move? Double-sided covers with black on the inside and reflective white on the outside. The black absorbs moisture while the white reflects heat. Worth every penny.
Remember to remove covers occasionally to let trapped moisture escape, especially in humid climates. A dry tire is a happy tire.
When to Replace Your RV Tires
Understanding the 5-year rule
Most RV experts swear by the 5-year rule, and it’s not just some random guideline. After 5 years, tire rubber compounds break down significantly, even if your tires look pristine on the surface.
I’ve seen perfectly good-looking tires blow out because they were 6 years old with barely any miles. The rubber simply ages, hardens, and loses flexibility – regardless of how they look or how many miles they’ve covered.
Think of it this way: would you risk your $100,000+ motorhome (not to mention your safety) to save a few hundred bucks on tires? Didn’t think so.
Reading manufacture dates
Finding your tire’s birthday isn’t complicated once you know where to look. Check the sidewall for a 4-digit number following the “DOT” code. The first two digits represent the week, and the last two represent the year.
For example, “2419” means your tire was manufactured in the 24th week of 2019.
If your tire only shows a 3-digit number, run—don’t walk—to get replacements. That tire is from the 1990s or earlier!
Signs that demand immediate replacement
Don’t wait for the 5-year mark if you spot these red flags:
- Cracks in the sidewall (even tiny ones)
- Uneven wear patterns
- Bulges or blisters anywhere on the tire
- Tread wear indicators becoming visible
- Vibration while driving
I once ignored a small sidewall crack on my fifth wheel. Three days later, I was stranded on I-40 with a complete blowout that damaged my fender too. Learn from my expensive mistake.
Balancing cost with safety in replacement decisions
RV tires aren’t cheap—I get it. A full set for a larger motorhome can easily run $3,000+. But consider the math:
| Expense | Approximate Cost |
| New tires | $1,500-$4,000 |
| Roadside blowout | $500-$1,000 |
| Damage repair | $2,000-$5,000+ |
| Ruined vacation | Priceless |
The reality? Tires are literally the only thing between your rig and the asphalt. They carry your home, your family, and everything you value at 65+ mph. This isn’t where you want to pinch pennies.
Professional inspection vs. DIY assessment
Can you check your own tires? Absolutely. Look for the warning signs I mentioned earlier, monitor pressure religiously, and check date codes.
But nothing beats a professional inspection. A good RV tire specialist will catch subtle issues you might miss:
- Early signs of belt separation
- Internal damage not visible from outside
- Proper torque on lug nuts
- Weight distribution problems affecting wear
If you’re not getting professional eyes on your tires at least annually, you’re gambling. Find a reputable RV service center that specializes in tire inspections—not just any auto shop. The difference in expertise matters when your home-on-wheels is at stake.
Handling Tire Emergencies on the Road
Essential tire tools for every RV owner
Ever had a tire issue in the middle of nowhere? Without the right tools, you’re toast. Smart RV owners never leave home without:
- A proper jack rated for your RV’s weight (not the flimsy one from your sedan)
- Wheel chocks (at least 4)
- Lug wrench with extension bar for leverage
- Torque wrench to properly tighten lug nuts
- Tire pressure gauge (digital ones are worth the extra bucks)
- Portable air compressor
- Tire repair kit with plugs
- Work gloves and kneeling pad
- Reflective triangles or flares
- Flashlight or headlamp with fresh batteries
Store these in an accessible compartment – not buried under your vacation gear. Check them before each trip. That $100 investment in tools can save you $500+ in emergency roadside service.
Step-by-step tire changing procedure
Changing an RV tire isn’t like changing a car tire. Here’s how to do it safely:
- Pull completely off the road on firm, level ground
- Turn on hazard lights and set up reflective triangles
- Secure the RV by putting the transmission in park and applying the parking brake
- Place wheel chocks on both sides of tires opposite to the flat
- Loosen (but don’t remove) lug nuts before jacking up
- Position jack under manufacturer’s recommended lift point
- Raise until the tire is just off the ground
- Remove lug nuts and flat tire
- Mount spare tire and hand-tighten lug nuts in a star pattern
- Lower RV and finish tightening with torque wrench to specifications
- Double-check all lug nuts after 50 miles
When to call for professional help
Sometimes DIY isn’t the way to go. Call the pros when:
- You’re on a dangerous roadside with heavy traffic
- The RV is on soft ground, steep incline, or unstable surface
- You have dual tires and lack proper equipment
- The flat has damaged your RV’s wheel well or surrounding components
- Weather conditions make changing unsafe (lightning, extreme heat, etc.)
- You have physical limitations that make the job dangerous
- You notice strange tire wear patterns suggesting alignment issues
Good roadside assistance costs about $150 annually. Considering tow trucks charge $250+ for RV service calls, it pays for itself with one use.
Temporary repair options for remote locations
Sometimes you’re too far from help. These temporary fixes can get you to civilization:
- Tire plugs work for small punctures in the tread (not sidewall damage)
- Tire sealant products like Fix-a-Flat can work for small leaks
- Spare tire is always best, but a can of tire inflator with sealant can buy you 50-100 miles
- Tire boots (special patches) can temporarily repair sidewall damage
- If absolutely desperate, stuffing a flat with grass/clothing can get you rolling briefly
Remember these are TEMPORARY solutions. Drive slowly (under 35mph), keep weight minimal, and replace/properly repair as soon as possible. A blown tire at highway speeds can cause a rollover – not worth the risk to save a few bucks.
Maintaining your RV tires is a crucial aspect of safe and enjoyable travel adventures. Proper tire pressure management, regular inspections, and appropriate storage practices all contribute significantly to extending the lifespan of your tires while ensuring optimal performance. Knowing when to replace your tires and being prepared for potential emergencies on the road are equally important skills for every RV owner.
Don’t wait until you’re stranded roadside to prioritize your RV tire maintenance. Take proactive steps today by implementing a regular tire care routine that includes pressure checks, thorough inspections, and appropriate seasonal storage. Your tires are literally where the rubber meets the road—investing time in their care now will reward you with countless miles of trouble-free RV adventures in the future.
We are hitting the road again. Check out our locations at https://lastingmemoriesrv.com/contact/ We are here to assist with RV recalls, repair, preventive maintenance, and inspections. Contact mike@lastingmemoriesrv.com