🚰 Is your RV’s freshwater system giving you trouble? You’re not alone. Many RV owners struggle with maintaining their freshwater inlet valve, leading to leaks, contamination, and costly repairs. But fear not! With the right knowledge and a bit of elbow grease, you can keep your RV’s water system running smoothly for years to come.
Imagine this: You’re on the perfect camping trip, surrounded by nature’s beauty. You reach for the tap, expecting a refreshing stream of clean water, but instead… nothing. Or worse, a trickle of rusty, foul-smelling liquid. Don’t let a neglected freshwater inlet valve ruin your adventure! By understanding the ins and outs of your RV’s water system and following some simple maintenance steps, you can ensure a steady supply of clean, fresh water wherever your travels take you.
In this guide, we’ll dive into everything you need to know about maintaining your RV’s freshwater inlet valve. From regular inspections and cleaning to troubleshooting common issues, we’ve got you covered. So, let’s get started and make sure your RV’s water system is always ready for your next great escape! 🏕️💧
Understanding Your RV’s Freshwater Inlet Valve
Locating the valve
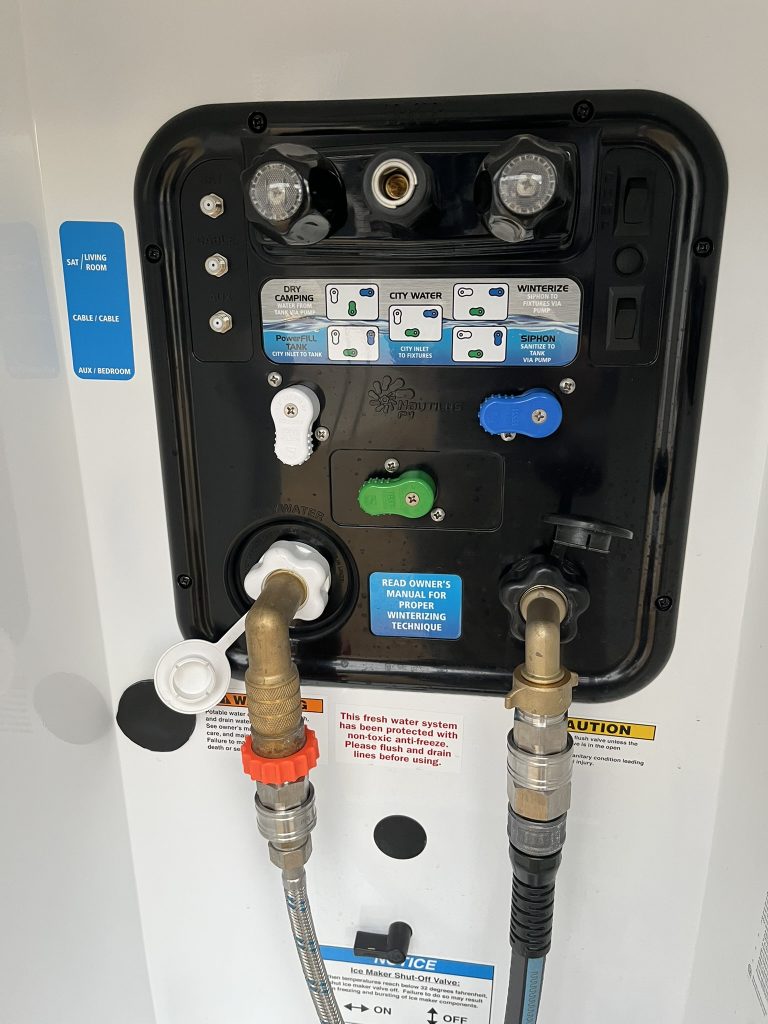
The freshwater inlet valve is typically located on the exterior of your RV, often near the front or side. Look for a small compartment or panel labeled “City Water Connection” or “Fresh Water Fill.” This valve is crucial for connecting your RV to an external water source, allowing you to fill your freshwater tank or use water directly from a campground hookup.

Components of the inlet valve
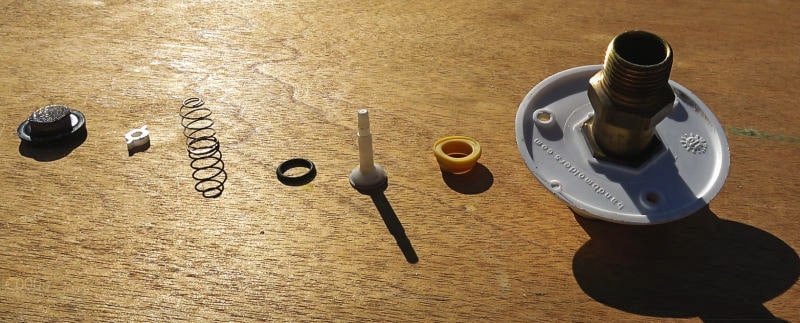
Understanding the components of your RV’s freshwater inlet valve is essential for proper maintenance. Here’s a breakdown of the main parts:
- Inlet fitting
- Check valve
- Pressure regulator
- Screen or filter
- O-rings or gaskets
| Component | Function |
| Inlet fitting | Connects external water source to RV |
| Check valve | Prevents backflow of water |
| Pressure regulator | Controls water pressure entering the RV |
| Screen/filter | Catches debris and sediment |
| O-rings/gaskets | Seal connections to prevent leaks |
Importance of proper maintenance
Maintaining your RV’s freshwater inlet valve is crucial for several reasons:
- Ensures clean, safe drinking water
- Prevents leaks and water damage
- Extends the lifespan of your RV’s plumbing system
- Avoids costly repairs or replacements
- Maintains proper water pressure throughout your RV
Regular maintenance of the inlet valve helps prevent issues such as contamination, leaks, and damage to your RV’s water system. By understanding the valve’s location, components, and importance, you’ll be better equipped to care for this essential part of your RV. In the next section, we’ll explore the steps for regular inspection and cleaning to keep your freshwater inlet valve in top condition.
Regular Inspection and Cleaning
Visual checks for damage or wear
Regular visual inspections are crucial for maintaining your RV’s freshwater inlet valve. Look for signs of:
- Cracks or fractures in the valve body
- Rust or corrosion
- Loose or damaged fittings
- Worn or frayed O-rings
Perform these checks at least monthly or before each trip to catch potential issues early.
Removing debris and buildup
Over time, debris and mineral deposits can accumulate in and around the valve. To remove:
- Disconnect the water supply
- Use a soft brush to gently scrub the valve and surrounding area
- Flush with clean water to remove loosened debris
- For stubborn buildup, use a mixture of vinegar and water (1:1 ratio)
Sanitizing the valve and surrounding area
Proper sanitization prevents bacterial growth:
- Mix 1/4 cup of bleach with 1 gallon of water
- Apply the solution to the valve and surrounding area
- Let it sit for 15 minutes
- Rinse thoroughly with clean water
Frequency of cleaning
| Cleaning Task | Frequency |
| Visual checks | Monthly or before each trip |
| Debris removal | Every 3-6 months |
| Sanitization | Twice a year or as needed |
Regular cleaning not only ensures proper function but also extends the life of your RV’s freshwater inlet valve. By following these steps, you’ll maintain a clean and safe water supply for your travels. Next, we’ll explore the importance of lubricating the valve to keep it operating smoothly.
Lubricating the Valve
Choosing the right lubricant
When it comes to lubricating your RV’s freshwater inlet valve, selecting the appropriate lubricant is crucial. Opt for a food-grade silicone lubricant or a water-based lubricant specifically designed for potable water systems. Avoid petroleum-based lubricants, as they can contaminate your water supply and damage rubber seals.
| Lubricant Type | Pros | Cons |
| Food-grade silicone | Long-lasting, safe for water systems | May be more expensive |
| Water-based | Easily accessible, affordable | May require more frequent application |
| Petroleum-based | Not recommended | Can contaminate water, damage seals |
Applying lubricant correctly
To properly lubricate your RV’s freshwater inlet valve:
- Clean the valve thoroughly with mild soap and water
- Dry the valve completely
- Apply a thin, even layer of lubricant to all moving parts
- Work the valve open and closed several times to distribute the lubricant
- Wipe away any excess lubricant
How often to lubricate
The frequency of lubrication depends on several factors:
- Usage: More frequent use requires more frequent lubrication
- Climate: Extreme temperatures may necessitate more frequent maintenance
- Storage conditions: RVs stored outdoors may need more attention
As a general rule, lubricate your freshwater inlet valve at least twice a year: once at the beginning of the camping season and once before winter storage. However, if you notice any stiffness or resistance when operating the valve, it’s time for a quick lubrication session.
Now that you know how to properly lubricate your RV’s freshwater inlet valve, let’s move on to replacing worn parts to ensure optimal performance.
Replacing Worn Parts
Signs of valve deterioration
Before diving into the replacement process, it’s crucial to recognize when your RV’s freshwater inlet valve needs replacing. Look out for these telltale signs:
- Leaks or drips around the valve
- Difficulty in opening or closing the valve
- Visible cracks or damage on the valve body
- Unusual noises when operating the valve
- Corrosion or rust on metal components
If you notice any of these issues, it’s time to consider replacing your valve.
Step-by-step replacement guide
- Gather necessary tools:
- Adjustable wrench
- Pliers
- Teflon tape
- New valve
- Shut off the water supply and drain the system
- Remove the old valve:
- Unscrew the retaining nut
- Carefully pull out the old valve
- Clean the valve opening thoroughly
- Apply Teflon tape to the threads of the new valve
- Insert the new valve and tighten the retaining nut
- Test for leaks by turning on the water supply
Remember to consult your RV’s manual for specific instructions related to your model. With the new valve in place, you’ll ensure a reliable water supply for your future adventures.
Avoiding common damaging practices
To ensure the longevity of your freshwater inlet valve, steer clear of these harmful practices:
- Over-tightening connections, which can strip threads
- Using harsh chemicals for cleaning
- Neglecting regular maintenance checks
- Exposing the valve to extreme temperatures without protection
By implementing these protective measures, you’ll significantly extend the life of your RV’s freshwater inlet valve. Next, we’ll explore how to troubleshoot common issues that may arise despite your best maintenance efforts.
Troubleshooting Common Issues
Dealing with leaks
Leaks are a common issue with RV freshwater inlet valves. To address this problem:
- Inspect connections: Check all fittings and connections for looseness or damage.
- Replace O-rings: Worn-out O-rings are often the culprit. Replace them if necessary.
- Apply thread tape: Use PTFE tape on threaded connections to ensure a watertight seal.
- Tighten connections: Use appropriate tools to securely tighten all fittings.
| Leak Location | Possible Cause | Solution |
| Around valve body | Damaged seal | Replace valve seal |
| At hose connection | Loose fitting | Tighten or replace fitting |
| From valve stem | Worn O-ring | Replace O-ring |
Addressing stuck valves
Stuck valves can be frustrating. Here’s how to tackle them:
- Apply lubricant: Use a food-grade silicone lubricant on moving parts.
- Gentle force: Try opening and closing the valve with controlled pressure.
- Warm water: Run warm water through the system to loosen any mineral deposits.
- Vinegar solution: For stubborn deposits, use a diluted vinegar solution to dissolve buildup.
Fixing poor water flow
Poor water flow can be caused by various factors:
- Clean the inlet screen: Remove and clean any debris from the inlet screen.
- Check for kinks: Ensure the water hose isn’t kinked or bent.
- Inspect for blockages: Look for any obstructions in the valve or connected pipes.
- Verify water pressure: Ensure your campground’s water pressure is sufficient.
When to seek professional help
While many issues can be resolved DIY, some situations require expert assistance:
- Persistent leaks despite repairs
- Cracked or severely damaged valve body
- Internal component failures
Remember, seeking professional help can prevent further damage and ensure your RV’s water system functions properly. If you need assistance contact Lasting Memories Mobile RV Services
Now that we’ve covered troubleshooting, let’s recap the key points for maintaining your RV’s freshwater inlet valve.
Maintaining your RV’s freshwater inlet valve is crucial for ensuring a steady and clean water supply during your travels. By regularly inspecting, cleaning, and lubricating the valve, you can prevent common issues and extend its lifespan. Remember to replace worn parts promptly and protect the valve from environmental damage to keep it functioning optimally.
Taking care of your RV’s freshwater inlet valve doesn’t have to be a daunting task. With a little knowledge and routine maintenance, you can easily keep this essential component in top condition. By following the steps outlined in this guide, you’ll be well-equipped to handle any issues that arise and enjoy worry-free adventures on the road. Happy RVing!
Servicing Crystal River and Citrus County Florida area for your RV repair and maintenance needs.
