Ever been stranded in a breathtaking campsite with a perfectly positioned RV but no power because your shore cord decided to call it quits? Nothing kills the adventure vibe faster.
Your RV shore power cord isn’t just a fancy extension cable—it’s your lifeline to comfort when you’re out exploring. From keeping the AC humming on scorching days to powering your coffee maker for those misty morning brews.
Proper RV shore power cord maintenance isn’t just about preventing inconvenient breakdowns. It’s about safety, extending equipment life, and avoiding those eye-watering replacement costs when you least expect them.
But here’s what most RV owners miss: the subtle warning signs of cord deterioration happen long before complete failure. And that’s exactly where the trouble begins…
Understanding Your RV Shore Power System
Key components and their functions
Your RV shore power system isn’t complicated once you break it down. The main parts include:
- Power Cord: This is your lifeline to electricity. Most RVs come with either a 30-amp or 50-amp cord that connects your rig to the campground’s power pedestal.
- Power Inlet: This is where the cord connects to your RV, often protected by a weatherproof cover.
- Converter/Charger: Transforms incoming AC power to DC power to run 12-volt systems and charge your batteries.
- Circuit Breaker Panel: Works just like in your home, protecting circuits from overloads and short circuits.
- Surge Protector: Not always built-in, but crucial for protecting your RV’s electrical system from power surges and incorrect polarity.
Different types of RV power cords and plugs
RV power connections aren’t one-size-fits-all:
- 30-amp Systems: Use a three-prong plug with a single 120-volt hot wire, providing up to 3,600 watts of power. Common in smaller to mid-sized RVs.
- 50-amp Systems: Have four prongs with two 120-volt hot wires, delivering up to 12,000 watts. Standard in larger RVs with multiple air conditioners or appliances.
- Dog Bone Adapters: These handy devices let you connect your RV to different amperage outlets when your ideal hookup isn’t available.
Importance of proper maintenance for safety and longevity
Taking care of your shore power system isn’t just about convenience—it’s about safety.
Damaged cords can cause electrical fires or electrocution. Water infiltration leads to corrosion that creates resistance, generating dangerous heat. Regular inspection might reveal issues before they become catastrophic failures.
Well-maintained connections also mean more reliable power. Nobody wants their air conditioner cutting out during a scorching summer night because of a preventable connection problem.
Plus, replacement parts aren’t cheap. A quality 50-amp power cord can set you back $$$$ money better spent on campground fees and adventures!
Regular Inspection Routine
A. Weekly visual checks for damage or wear
Your RV shore power cord takes a beating week after week. Give it a quick once-over every weekend. Look for:
- Cracked or melted plastic on the plug
- Exposed wires anywhere along the cord
- Bent or broken prongs
- Discoloration (a sign of overheating)
- Loose parts that wiggle when touched
This takes two minutes tops but can save you from a campground nightmare. I run my fingers along the cord while checking – you can feel problems before you see them sometimes.
B. Monthly connection testing protocol
Once a month, go beyond looking and actually test your connections:
- Check that the plug fits snugly in different outlets
- Listen for any buzzing or crackling sounds when connected
- Feel for unusual warmth at connection points
- Test the power with a multimeter
- Verify your RV’s voltage meter reads correctly
Catch a loose connection early and you’ll avoid that frustrating moment when your AC cuts out during the hottest day of your trip.
C. Seasonal deep inspection guidelines
When the seasons change, your power system needs extra attention:
- Remove the plug cover and check for corrosion, dirt, or moisture (always ensure that your disconnected from power)
- Tighten any loose screws inside the plug housing
- Apply dielectric grease to metal contacts
- Inspect where the cord enters your RV for seal integrity
- Coil and store properly if winterizing
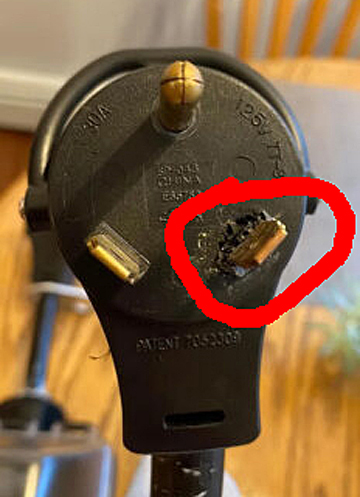
D. Warning signs that require immediate attention
Stop using your shore power immediately if you notice:
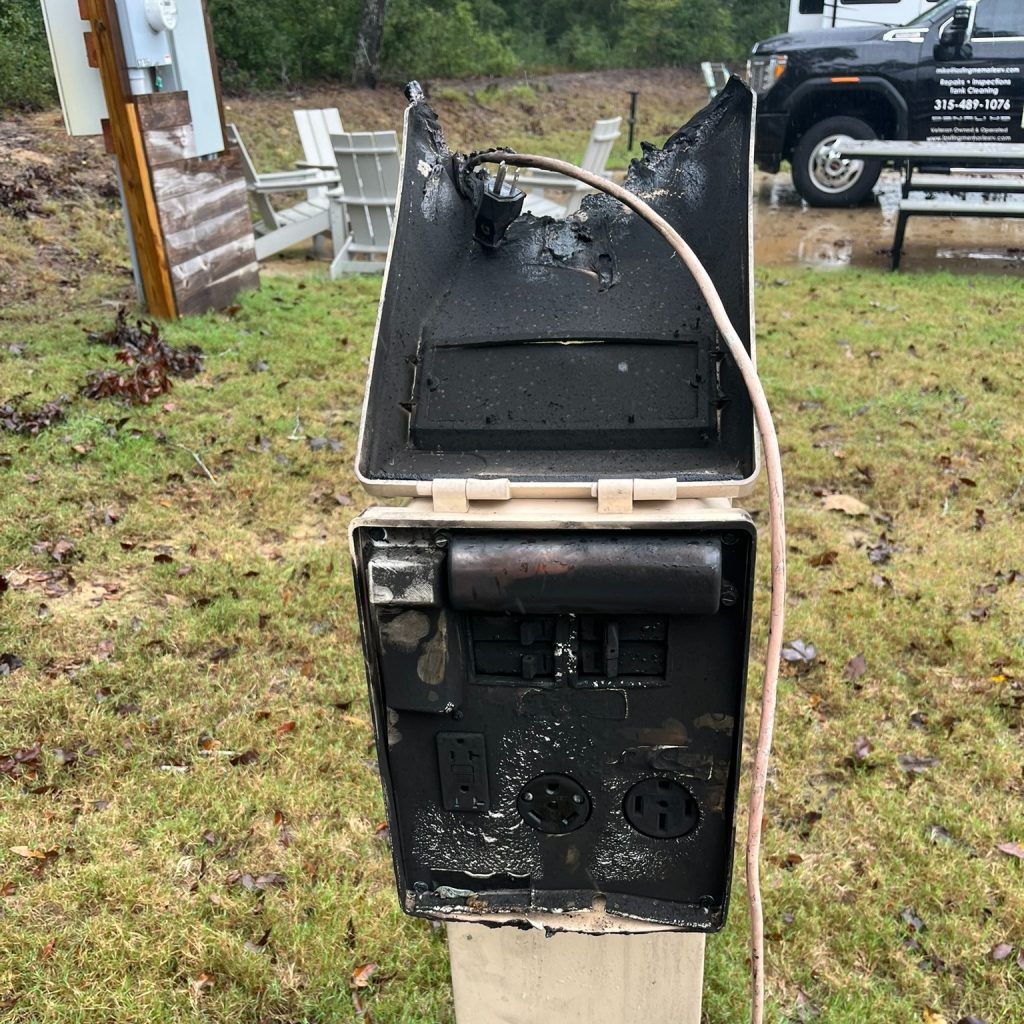
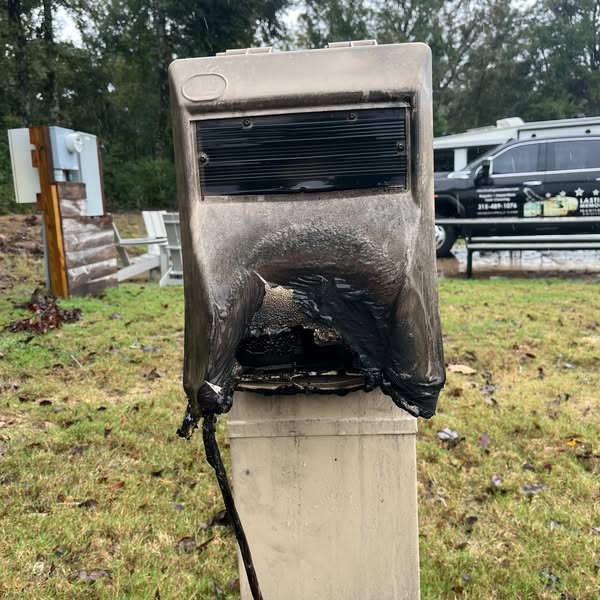
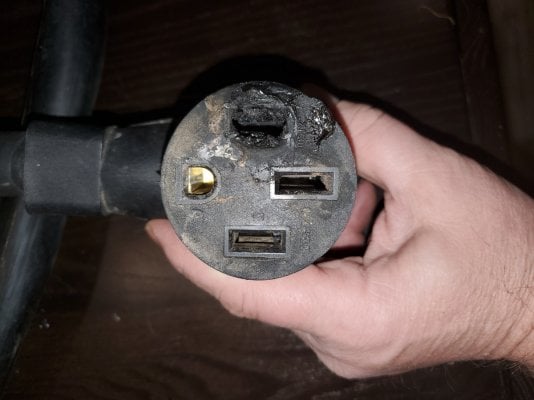
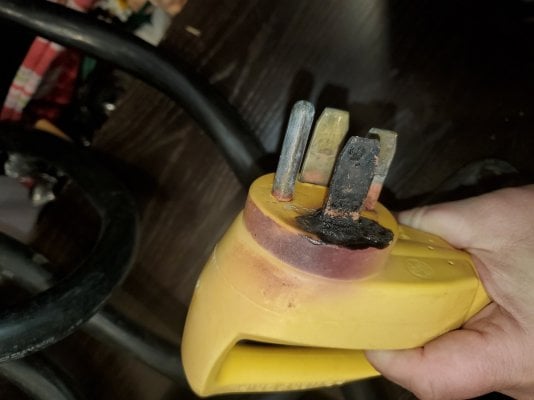
- Burn marks on the plug or receptacle
- Melted plastic anywhere
- Sparks when connecting or disconnecting
- Tripping breakers consistently
- Unexplained power fluctuations
- Strong burning smell
- Hot-to-touch cord or connections
These aren’t “wait until later” problems – they’re fire hazards waiting to happen. Cut power and address them right away.
Cleaning and Maintenance Techniques
Safe cleaning methods for plugs and receptacles
Ever looked at your RV shore power cord and thought, “That’s definitely seen better days”? Regular cleaning prevents electrical issues and extends the life of your connections.
First, always disconnect your power cord before cleaning. Safety first, folks!
For basic cleaning:
- Wipe plugs with a dry cloth to remove dust and dirt
- Use a slightly damp cloth with mild soap for stubborn grime
- Never soak electrical components or use harsh chemicals
- Dry thoroughly before reconnecting
Got a really dirty plug? Try using an electrical contact cleaner spray – it’s specifically designed for this job and evaporates without leaving residue.
Removing corrosion and oxidation effectively
Corrosion is the silent killer of electrical connections. Those greenish-white deposits aren’t just ugly – they’re preventing good electrical contact.
For light corrosion:
- Mix a paste of baking soda and water
- Apply with an old toothbrush or wire brush
- Gently scrub the affected areas
- Rinse with clean water and dry completely
For heavier corrosion:
- Use a commercial electrical contact cleaner
- A pencil eraser works surprisingly well on metal prongs
- Fine grit sandpaper (600 grit or higher) for stubborn spots
- Apply a thin coat of dielectric grease after cleaning
Proper storage practices to prevent damage
Your shore power cord needs a good home when not in use. Improper storage leads to cracked insulation and bent prongs.
Storage dos and don’ts:
- Coil the cord loosely using the over-under technique
- Avoid tight bends that can crack the insulation
- Store in a dedicated container or bag
- Don’t just stuff it anywhere convenient
- Keep it in a climate-controlled area if possible
Weatherproofing techniques for outdoor exposure
Mother Nature isn’t kind to electrical connections. Rain, UV rays, and temperature swings all take their toll.
Protect your connections with:
- Waterproof covers for both plug and receptacle ends
- Apply dielectric grease to metal contacts
- Install a power cord entry door on your RV
- Consider a dedicated shore power cord storage box
A simple cover can prevent water infiltration that leads to dangerous shorts and failures.
Troubleshooting Common Shore Power Issues
A. Diagnosing connection problems
When your RV shore power isn’t working right, start with the basics. Check if the power pedestal breaker is on. Sounds obvious, but you’d be surprised how often that’s the issue.
Next, inspect your cord and plug for visible damage. Look for burn marks, melted plastic, or bent prongs. These are big red flags. If the plug feels loose when connected, that’s trouble waiting to happen.
No visible problems? Get yourself a simple outlet tester from any hardware store. They cost under $10 and can tell you if the campground’s outlet is wired correctly. Wrong wiring is more common than you’d think at RV parks.
Still no luck? Test your RV’s internal breakers and reset them if needed. Sometimes the main breaker trips but doesn’t visibly move to the “off” position.
B. Addressing overheating concerns
A hot power cord is bad news. If your cord or plug feels warm to the touch, disconnect it immediately. This usually happens because of loose connections or corrosion creating resistance.
Clean both your plug and the campground receptacle with electrical contact cleaner. Make sure everything’s dry before reconnecting.
Overheating can also happen when you’re drawing too much power. Using a 30-amp connection? Be mindful of running multiple appliances simultaneously. Your microwave, air conditioner, and electric water heater together might be too much for the system.
C. Fixing intermittent power delivery
Random power fluctuations drive RVers crazy. First, check if your cord is fully seated in both the RV and pedestal connections. Sometimes they look connected but aren’t making full contact.
If you’re experiencing brownouts (lights dimming, appliances slowing down), you might be dealing with voltage issues from the campground. A portable surge protector with voltage display can confirm this.
For intermittent failures, wiggle your cord gently while it’s connected. If power cuts in and out, you’ve found your problem—internal wire damage, usually near the plug or where the cord enters your RV.
D. When to repair versus when to replace
Small issues are sometimes fixable. If your plug prongs are slightly bent, you can carefully realign them. Surface corrosion can be removed with fine sandpaper followed by contact cleaner.
But don’t mess around with serious damage. Replace your cord immediately if you notice:
- Cracked insulation exposing wires
- Melted plastic on plugs
- Internal wires visible at flex points
- Discoloration from overheating
Attempting to repair severely damaged power equipment isn’t worth the risk. This isn’t about saving money—it’s about preventing electrical fires.
The 50-amp plugs are particularly expensive to replace, but consider this: a new cord costs way less than fire damage to your RV or, worse, injury to yourself or others.
Upgrading and Protecting Your Shore Power Equipment
Quality adapters and why they matter
Ever plugged in your RV only to find out the campground offers a different outlet type? That’s where quality adapters come in. But don’t just grab the cheapest one you can find.
Poor-quality adapters can overheat, melt, or even cause electrical fires. Good adapters use thick copper wiring, corrosion-resistant materials, and proper insulation. They cost more, but they won’t burn your rig down – seems like a fair trade, right?
Look for UL-listed adapters with weatherproof seals. The connector pins should be solid brass, not hollow or flimsy. A good 50-to-30 amp dogbone adapter might cost $50+, but it’ll outlast several cheap ones and keep your electrical system safe.
Surge protectors and energy management systems
Your RV’s electrical components cost thousands. A $300 surge protector seems pretty reasonable by comparison.
Basic surge protectors shield against voltage spikes, but advanced Energy Management Systems (EMS) do much more:
- Monitor incoming voltage
- Protect against open neutral connections
- Shut off power when conditions are unsafe
- Prevent power from connecting until safe
Most EMS units also display real-time power readings so you can see exactly what’s coming into your rig. Portable options work great if you move frequently, while hardwired versions offer permanent protection.
Weatherproof covers and storage solutions
Nothing ruins electrical connections faster than water and dirt. Weatherproof covers for your shore power connection points prevent moisture intrusion when plugged in.
For storage, consider:
- Coiled cord bags with ventilation
- Plastic storage tubes with end caps
- Dedicated compartment organizers
The best storage solutions allow air circulation to prevent moisture buildup while keeping dirt and critters away from your cord.
Documentation and maintenance tracking tools
Smart RVers keep detailed records. Create a maintenance log that tracks:
- Inspection dates
- Cleaning schedules
- Replacement parts and dates
- Electrical issues encountered
Digital maintenance apps let you set reminders and store photos of your equipment. Some even sync across devices so you never miss routine maintenance.
Professional inspection recommendations
DIY maintenance is great, but professional eyes catch things we miss. Have your shore power system inspected:
- Annually by certified RV technicians
- After any electrical incident
- Before extended storage periods
- When purchasing a used RV
These inspections typically cost $75-150 but can identify dangerous issues before they cause expensive damage or safety hazards. Ask the technician to check terminations, grounding systems, and all connection points.
Proper maintenance of your RV shore power cord and plug is essential for safe and reliable electrical connections during your travels. By implementing regular inspections, cleaning routines, and knowing how to troubleshoot common issues, you can prevent power failures and potential hazards. Remember that damage to insulation, bent prongs, or corroded connections should be addressed immediately to ensure safety.
Take proactive steps to protect your investment by upgrading to higher-quality equipment when necessary and using protective accessories like cord covers and surge protectors. With consistent care and attention to your shore power system, you’ll enjoy worry-free camping experiences and extend the lifespan of your electrical components. Start incorporating these maintenance practices into your RV routine today to avoid power problems on your next adventure.
Lasting Memories Mobile RV Services is at Keystone Heights RV Resort in Florida. We service Keystone Heights, Bradford & Clay County Florida and the surrounding areas. Schedule your tank cleaning, repair and maintenance appointment now.