
Picture this: You’re all set for your dream RV adventure, but as you hit the road, you notice your trailer lights aren’t working. 😨 Frustrating, right? This common problem often stems from issues with your RV’s seven-way cord and junction box – the unsung heroes of your trailer’s electrical system.
Don’t let electrical gremlins ruin your trip! 🛠️ By learning how to inspect your RV trailer’s seven-way cord and junction box, you can catch potential problems before they leave you stranded. Whether you’re a seasoned RV enthusiast or a newbie camper, this simple maintenance task can save you time, money, and headaches on the road.
In this guide, we’ll walk you through the entire process of inspecting these crucial components. From understanding what these parts do to troubleshooting common issues, we’ve got you covered. So, grab your tools and let’s dive into keeping your RV’s electrical system in top shape for your next adventure!
Understanding the Seven Way Cord and Junction Box
What is a Seven Way Cord?
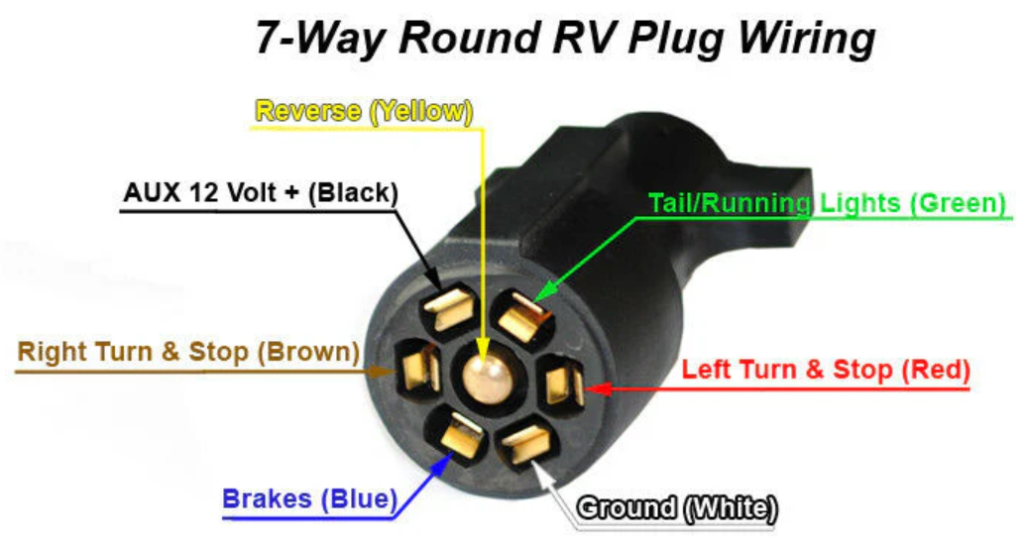
A Seven Way Cord, also known as a 7-pin connector, is a crucial component in RV trailers that enables electrical communication between the towing vehicle and the trailer. This cord consists of seven wires, each responsible for different functions:
- Ground
- Left turn signal/brake
- Right turn signal/brake
- Taillights
- 12V power
- Electric brakes
- Reverse lights
| Pin Number | Function |
| 1 | Ground |
| 2 | Left turn signal/brake |
| 3 | Right turn signal/brake |
| 4 | Taillights |
| 5 | 12V power |
| 6 | Electric brakes |
| 7 | Reverse lights |
Function of the Junction Box
The Junction Box serves as a central hub for the electrical connections in your RV trailer. It:
- Distributes power from the Seven Way Cord to various trailer systems
- Houses fuses and circuit breakers for protection
- Provides a convenient access point for troubleshooting
- Allows for easy upgrades or modifications to the electrical system
Importance of regular inspections
Regular inspections of your Seven Way Cord and Junction Box are crucial for:
- Ensuring safety while towing
- Preventing electrical failures on the road
- Identifying wear and tear before it leads to major issues
- Maintaining proper functionality of trailer lights and brakes
- Avoiding costly repairs due to neglected maintenance
Now that we understand the basics of the Seven Way Cord and Junction Box, let’s move on to preparing for the inspection process.
Preparing for the Inspection
Necessary tools and equipment
To properly inspect your RV trailer’s seven-way cord and junction box, you’ll need the following tools:
- Multimeter
- Flashlight
- Screwdriver set (flathead and Phillips)
- Wire brush
- Electrical contact cleaner
- Dielectric grease
| Tool | Purpose |
| Multimeter | Testing electrical connections |
| Flashlight | Illuminating dark areas |
| Screwdrivers | Accessing junction box |
| Wire brush | Cleaning corroded terminals |
| Contact cleaner | Removing dirt and oxidation |
| Dielectric grease | Protecting connections |
Safety precautions
Before beginning the inspection, ensure you follow these safety measures:
- Wear protective gloves and eyewear
- Work in a dry, well-ventilated area
- Avoid inspecting during wet or stormy conditions
- Keep children and pets away from the work area
- Have a fire extinguisher nearby
Disconnecting power sources
To safely inspect your RV’s electrical system:
- Turn off all appliances and lights in the RV
- Disconnect the RV from shore power
- Disconnect the battery, starting with the negative terminal
- Wait at least 5 minutes for any residual charge to dissipate
Now that we’ve covered the preparation steps, we’re ready to move on to the actual inspection process of the seven-way cord.
Inspecting the Seven Way Cord
Checking for physical damage
Begin your inspection by carefully examining the Seven Way Cord for any visible signs of wear or damage. Look for:
- Cracks or splits in the cord’s insulation
- Exposed wires
- Bent or broken connector pins
- Corrosion or rust on metal parts
A thorough visual inspection can reveal potential issues before they become serious problems.
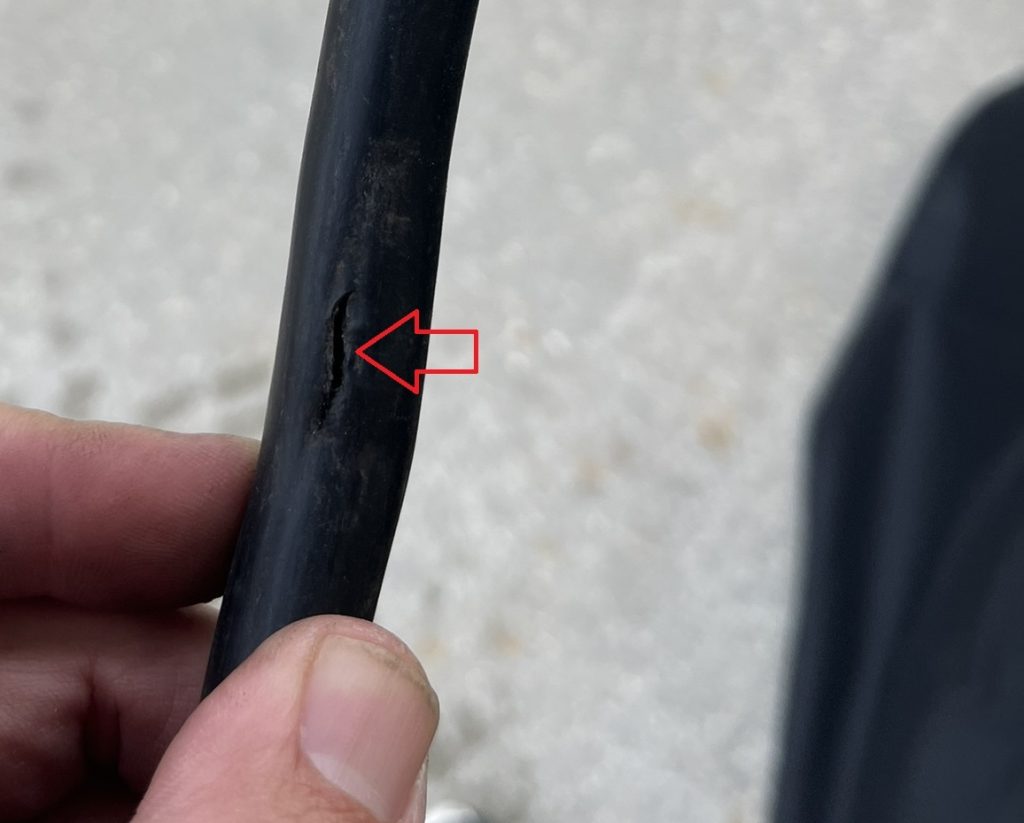
Break in 7 Pin RV Trailer Cord
Use this checklist to ensure you don’t miss any crucial areas:
| Area to Check | What to Look For |
| Cord Insulation | Cracks, splits, or exposed wires |
| Connector Pins | Bending, breakage, or corrosion |
| Metal Parts | Rust or excessive wear |
| Connection Points | Loose or damaged connections |
Testing continuity
After the visual inspection, use a multimeter to test the continuity of each wire in the Seven Way Cord. This ensures that electrical signals can flow properly through the cord. Follow these steps:
- Set your multimeter to the continuity testing mode
- Touch one probe to a pin on one end of the cord
- Touch the other probe to the corresponding pin on the other end
- Listen for a beep or observe the meter reading
- Repeat for all seven connections
Examining the connector pins
Closely inspect the connector pins for any signs of damage or misalignment. Ensure that:
- All pins are straight and properly aligned
- There’s no visible corrosion or oxidation
- Pins are securely fastened in the connector housing
Cleaning the cord and connector
Regular cleaning helps maintain the cord’s performance and longevity. Use these steps:
- Disconnect the cord from power sources
- Use a soft brush to remove dirt and debris
- Clean the connector pins with electrical contact cleaner
- Dry thoroughly with a lint-free cloth
- Apply dielectric grease to prevent corrosion
With the Seven Way Cord thoroughly inspected and cleaned, you’re now ready to move on to examining the Junction Box, which plays a crucial role in your RV’s electrical system.
Examining the Junction Box
Opening the junction box safely
Before examining your RV’s junction box, safety should be your top priority. Follow these steps to open the junction box safely:
- Disconnect power sources
- Wear protective gear
- Use appropriate tools
- Work in a well-lit area
| Safety Precaution | Reason |
| Disconnect power | Prevent electrical shock |
| Wear gloves | Protection from sharp edges |
| Use insulated tools | Avoid accidental shorts |
| Ensure good lighting | Spot potential issues easily |
Inspecting wiring connections
Once you’ve safely opened the junction box, carefully examine all wiring connections. Look for:
- Loose or disconnected wires
- Frayed or damaged insulation
- Color-coded wire matches
- Proper terminal connections
Checking for corrosion or moisture
Corrosion and moisture are common culprits for electrical issues in RVs. Inspect the junction box interior for:
- Rust or oxidation on metal surfaces
- White or green powdery deposits on connections
- Water droplets or dampness
- Signs of previous water damage
If you notice any of these issues, it’s crucial to address them promptly to prevent further damage and ensure safe operation of your RV’s electrical system.
Testing fuses and circuit breakers
Lastly, verify the condition of fuses and circuit breakers within the junction box:
- Visually inspect fuses for signs of burning or melting
- Use a multimeter to test fuse continuity
- Check circuit breakers for proper operation
- Ensure correct amperage ratings for each circuit
Now that we’ve thoroughly examined the junction box, let’s move on to troubleshooting common issues that may arise in your RV’s electrical system.
Troubleshooting Common Issues
A. Identifying loose connections
Loose connections are a common issue in RV electrical systems. To identify them:
- Gently wiggle each wire connection
- Look for any movement or intermittent contact
- Check for discoloration or heat damage around terminals
Loose connections can cause:
- Intermittent power loss
- Overheating
- Electrical arcing
| Sign | Potential Issue | Action Required |
| Wiggle movement | Loose connection | Tighten connection |
| Discoloration | Heat damage | Replace wire and terminal |
| Corrosion | Poor conductivity | Clean or replace terminal |
B. Replacing damaged wires
When you encounter damaged wires:
- Identify the damaged section
- Cut out the damaged portion
- Strip the ends of the remaining wire
- Use appropriate gauge wire for replacement
- Solder or crimp the new wire in place
- Insulate the connection with heat shrink tubing
C. Fixing corroded terminals
Corrosion can significantly impact electrical performance. To address this:
- Disconnect the battery
- Remove the corroded terminal
- Clean the area with a wire brush or sandpaper
- Apply dielectric grease to prevent future corrosion
- Replace the terminal if severely damaged
D. Addressing water ingress problems
Water ingress can cause severe electrical issues. To prevent and fix:
- Inspect seals and gaskets regularly
- Replace damaged seals immediately
- Use silicone sealant for additional protection
- Ensure proper drainage around the junction box
- Consider installing a protective cover for extra shielding
Regular maintenance and prompt addressing of these issues will help ensure your RV’s electrical system remains reliable and safe during your travels.
Maintaining Your RV Electrical System
Regular cleaning schedule
Maintaining a regular cleaning schedule for your RV’s electrical system is crucial for its longevity and performance. Here’s a simple cleaning routine to follow:
- Monthly:
- Inspect and clean the seven-way cord and plug
- Check for corrosion in the junction box
- Wipe down exterior connections
- Quarterly:
- Deep clean the junction box
- Test all electrical connections
- Clean battery terminals
| Component | Cleaning Method | Frequency |
| Seven-way cord | Mild soap and water | Monthly |
| Junction box | Compressed air and contact cleaner | Quarterly |
| Battery terminals | Baking soda solution | Quarterly |
Applying dielectric grease
Dielectric grease is essential for protecting electrical connections from moisture and corrosion. Apply a thin layer to:
- Seven-way cord pins
- Junction box terminals
- Battery terminals
Remember to reapply after each cleaning session to maintain optimal protection.
Proper storage techniques
When storing your RV, protect the electrical system by:
- Covering the seven-way cord plug
- Closing the junction box securely
- Disconnecting the battery and storing it in a cool, dry place
- Using a breathable RV cover to prevent moisture buildup
When to seek professional help
While regular maintenance can be done by RV owners, some situations require professional assistance:
- Persistent electrical issues
- Signs of significant corrosion or damage
- Wiring repairs or replacements
- Annual professional inspection for peace of mind
Regular maintenance and timely professional help ensure your RV’s electrical system remains in top condition for safe and enjoyable travels.
Regular inspection of your RV trailer’s seven-way cord and junction box is crucial for maintaining a safe and reliable electrical system. By following the steps outlined in this guide, you can identify potential issues early, prevent electrical failures, and ensure your RV’s lights, brakes, and other essential systems function properly during your travels.
Remember to inspect your seven-way cord and junction box before each trip and perform routine maintenance throughout the camping season. If you encounter any problems or feel unsure about handling electrical components, don’t hesitate to consult a mobile RV technician, use RV Help to locate a certified tech. Prioritizing the health of your RV’s electrical system will contribute to safer, more enjoyable adventures on the road. Lasting Memories Mobile RV Services is at Keystone Heights RV Resort in Florida. We will be servicing Keystone Heights, Bradford & Clay County Florida and the surrounding areas. Schedule your tank cleaning, repair and maintenance appointment now.