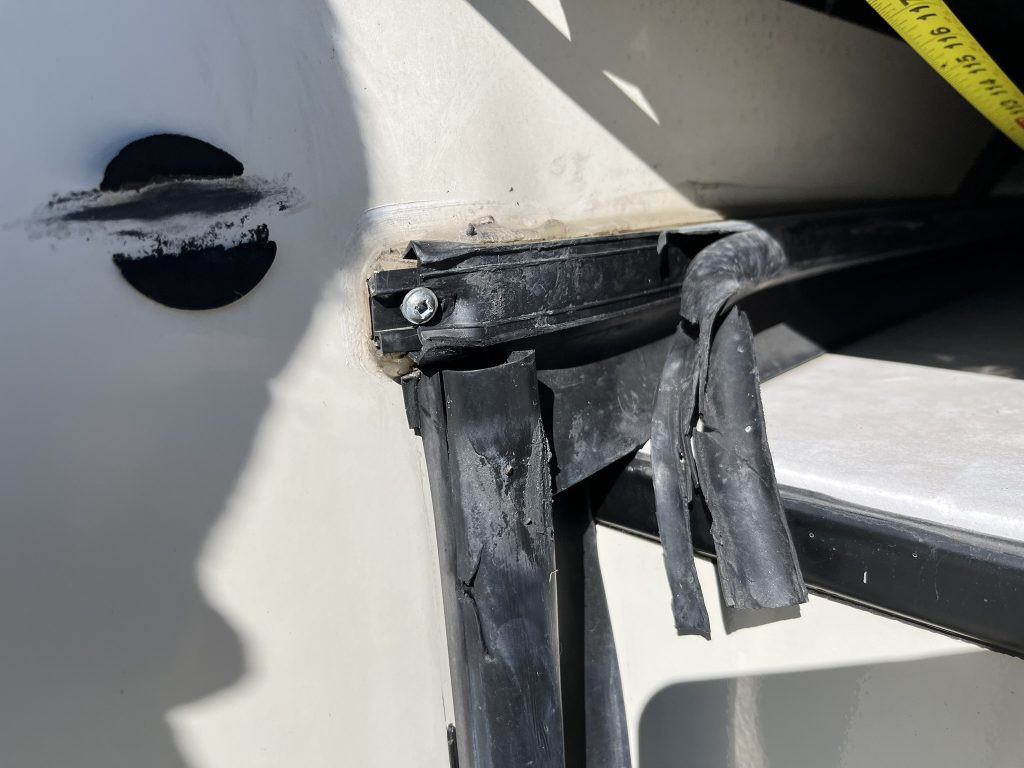
Picture this: You’re on the open road, enjoying the freedom of RV life, when suddenly you notice a dreaded leak in your slide-out. 😱 Water damage can quickly turn your dream vacation into a costly nightmare. But fear not, fellow adventurers! The key to preventing such disasters lies in one crucial maintenance task: inspecting your RV slide seals.
Whether you’re a seasoned RV enthusiast or a newbie to the nomadic lifestyle, understanding how to properly inspect your slide seals is essential for protecting your home on wheels. 🏠🚐 These unsung heroes keep water, dust, and critters at bay, ensuring your RV remains a cozy sanctuary. But how exactly do you go about inspecting them? Don’t worry – we’ve got you covered!
In this comprehensive guide, we’ll walk you through the ins and outs of RV slide seal inspection. From understanding what these seals are and how to prepare for inspection, to mastering visual and physical inspection techniques, we’ll equip you with the knowledge to spot common issues and address any findings. So, grab your inspection toolkit, and let’s dive into the world of RV slide seals to keep your adventures leak-free and worry-free! 🔍🛠️
Understanding RV Slide Seals

What are RV slide seals?
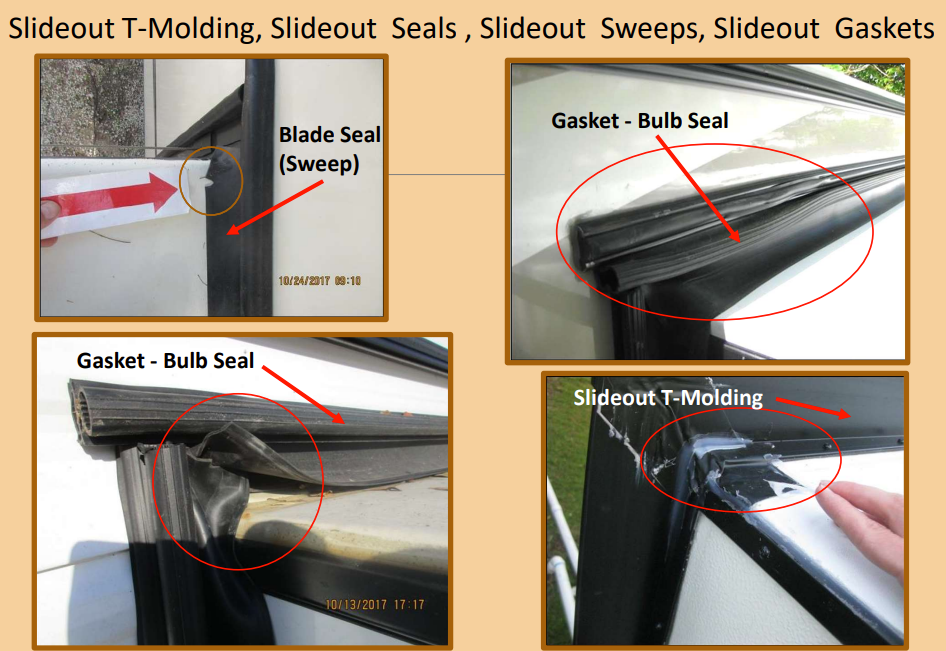
RV slide seals are essential components that create a watertight barrier between the RV’s main body and its slide-out sections. These flexible strips of rubber or silicone are designed to prevent water, dust, and debris from entering the RV when the slide-outs are extended or retracted.
Importance of maintaining slide seals
Proper maintenance of RV slide seals is crucial for several reasons:
- Prevents water damage and leaks
- Ensures energy efficiency
- Enhances comfort by keeping out drafts and insects
- Prolongs the lifespan of the RV and its components
Types of RV slide seals
There are several types of RV slide seals, each serving a specific purpose:
- Bulb seals
- Wiper seals
- Compression seals
- Sliding seals
| Seal Type | Description | Best For |
| Bulb seals | Round, hollow profile | Top and sides of slide-outs |
| Wiper seals | Flat, flexible strips | Bottom of slide-outs |
| Compression seals | Dense foam or rubber | Tight sealing areas |
| Sliding seals | Low-friction material | Areas with frequent movement |
Understanding these different types of seals and their functions is essential for proper inspection and maintenance of your RV’s slide-out system. Regular checks and timely replacements can prevent costly repairs and ensure a comfortable and dry RV experience. As we move forward, we’ll explore the necessary steps to prepare for a thorough inspection of your RV’s slide seals.
Preparing for Inspection
Preparing for Inspection
Before diving into the inspection process, it’s crucial to be well-prepared. This section covers the essential tools, safety measures, and ideal conditions for inspecting your RV slide seals.
A. Necessary tools and equipment
To effectively inspect your RV slide seals, you’ll need the following items:
- Flashlight
- Mirror on an extendable handle
- Soft brush
- Cleaning solution
- Microfiber cloth
- Ladder (for taller RVs)
- Camera or smartphone (for documentation)
| Tool | Purpose |
| Flashlight | Illuminate hard-to-see areas |
| Mirror | View hidden corners and underneath seals |
| Soft brush | Remove debris without damaging seals |
| Cleaning solution | Clean seals for better visibility |
| Microfiber cloth | Wipe seals without leaving residue |
B. Safety precautions
Ensure your safety during the inspection by following these guidelines:
- Wear protective gloves to avoid cuts or scrapes
- Use proper ladder safety techniques
- Have a spotter present when using a ladder
- Avoid inspecting in extreme weather conditions
- Be cautious of sharp edges around slide mechanisms
C. Optimal conditions for inspection
For the best results, conduct your inspection under these conditions:
- Dry weather to avoid moisture interference
- Daylight hours for better visibility
- Clean RV exterior to easily spot issues
- Fully extended slides for comprehensive access
Now that you’re equipped with the right tools, safety knowledge, and ideal conditions, you’re ready to move on to the visual inspection techniques.
Physical Inspection Methods
Physical Inspection Methods
Now that we’ve covered visual inspection techniques, let’s delve into hands-on methods to assess your RV slide seals’ condition.
A. Testing seal compression
To evaluate seal compression:
- Close the slide completely
- Insert a thin piece of paper between the seal and the RV body
- Attempt to pull the paper out
If you feel resistance, the seal is compressing properly. Repeat this test at various points along the seal to ensure uniform compression.
B. Checking for proper adhesion
Proper adhesion is crucial for effective sealing. Here’s how to check:
- Gently tug on the seal at different points
- Look for any areas where the seal easily separates from the surface
- Pay attention to corners and edges, as these are prone to detachment
| Adhesion Level | Description | Action Required |
| Good | Seal firmly attached | Regular maintenance |
| Fair | Minor separation in spots | Monitor closely |
| Poor | Significant detachment | Immediate repair/replacement |
C. Assessing flexibility and elasticity
A healthy seal should be flexible and elastic. To test:
- Gently pinch a small section of the seal
- Release and observe how quickly it returns to its original shape
- Check for any cracks or brittleness while flexing the seal
Seals that remain compressed or show signs of cracking may need replacement. Remember, maintaining your RV slide seals is crucial for protecting your vehicle from water damage and maintaining energy efficiency.
Common Issues to Look For
Common Issues to Look For
When inspecting your RV slide seals, it’s crucial to be aware of the most frequent problems that can compromise their effectiveness. Here are the key issues to watch out for:
A. Cracks and tears
Cracks and tears in slide seals can lead to water infiltration and air leaks. Look for:
- Visible splits or cuts in the rubber material
- Small fissures that may expand over time
- Separation of the seal from the slide-out frame
B. Dry rot and deterioration
Exposure to UV rays and harsh weather conditions can cause dry rot and deterioration. Check for:
- Brittleness or crumbling of the seal material
- Loss of elasticity when touched
- Discoloration or fading of the seal
C. Water damage and mold growth
Moisture intrusion can lead to water damage and mold growth. Inspect for:
- Stains or discoloration on the seal or surrounding areas
- Musty odors near the slide-out
- Visible mold or mildew on the seal or adjacent surfaces
D. Improper installation
Incorrectly installed seals can fail to provide adequate protection. Look out for:
- Gaps between the seal and the RV body
- Uneven compression when the slide is retracted
- Visible signs of seal misalignment
| Issue | Visual Cues | Potential Consequences |
| Cracks and tears | Visible splits, cuts | Water infiltration, air leaks |
| Dry rot | Brittleness, discoloration | Seal failure, reduced effectiveness |
| Water damage | Stains, musty odors | Structural damage, health hazards |
| Improper installation | Gaps, uneven compression | Inadequate protection, accelerated wear |
By familiarizing yourself with these common issues, you’ll be better equipped to identify potential problems during your RV slide seal inspection. Regular checks and prompt addressing of these issues can significantly extend the life of your seals and protect your RV from damage.
Addressing Inspection Findings
Addressing Inspection Findings
Now that you’ve completed a thorough inspection of your RV slide seals, it’s time to address any issues you’ve discovered. Let’s explore the various approaches to maintaining and repairing your slide seals.
Minor Repairs and Maintenance
For minor issues, simple maintenance tasks can often suffice:
- Clean seals with mild soap and water
- Apply a UV protectant to prevent drying and cracking
- Tighten loose fasteners or screws
When to Replace Seals
| Condition | Action Required |
| Small cracks | Monitor closely |
| Large cracks or tears | Replace immediately |
| Severe discoloration | Consider replacement |
| Loss of flexibility | Replace soon |
Professional vs. DIY Repairs
Deciding between professional and DIY repairs depends on several factors:
- Skill level
- Time availability
- Complexity of the repair
- Cost considerations
For complex issues or if you’re unsure, it’s best to consult a professional RV technician.
Preventive Measures for Future Protection
To extend the life of your RV slide seals:
- Regular cleaning and lubrication
- Use slide-out covers when parked
- Avoid prolonged exposure to harsh weather
- Perform routine inspections
By addressing inspection findings promptly and implementing preventive measures, you’ll ensure your RV slide seals remain in top condition, protecting your investment and enhancing your travel experience.
Regular inspection of RV slide seals is crucial for maintaining your vehicle’s integrity and preventing costly damage. By following the steps outlined in this guide, you can effectively assess the condition of your slide seals, identify potential issues, and take appropriate action. Remember to conduct both visual and physical inspections, paying close attention to signs of wear, tear, and damage.
Don’t hesitate to address any problems you discover during your inspection promptly. Whether it’s applying a seal conditioner, replacing worn seals, or seeking professional assistance, timely maintenance will ensure your RV remains weatherproof and road-ready. By making slide seal inspection a regular part of your RV maintenance routine, you’ll enjoy worry-free travels and extend the life of your cherished recreational vehicle.
We are here to help, contact Lasting Memories Mobile RV Services at mike@lastingmemoriesrv.com . Now servicing the Orange Beach, Alabama; Foley, Alabama; Gulf Shores, Alabama; Pensacola, Florida and surrounding areas.
