Ever pulled up to a campsite during a rainstorm, only to discover your RV’s roof has been silently leaking for months? Trust me, that’s a camping memory no one wants.
Your RV roof is basically the thin barrier between you and every element Mother Nature throws your way. Yet most owners pay more attention to their rig’s fancy gadgets than the actual structure keeping them dry and comfortable.
Regular RV roof inspections aren’t just maintenance busywork—they’re your first line of defense against potentially catastrophic (and expensive) damage. A small crack today becomes a structural nightmare tomorrow.
So how often should you actually climb up there? And what exactly are you looking for when inspecting your RV roof? The answers might surprise even veteran RVers who think they’ve seen it all.
Understanding RV Roof Structures and Materials
Common RV Roof Types and Their Durability Factors
Your RV roof isn’t just a cover—it’s your first line of defense against the elements. And trust me, not all roofs are created equal.
Most RVs come with one of four roof types: rubber (EPDM or TPO), fiberglass, aluminum, or crowned aluminum. Each has its own personality when it comes to durability.
Rubber roofs are the most common, and for good reason. They’re lightweight, relatively inexpensive, and can last 10-15 years with proper care. But they’re also drama queens when it comes to UV damage and can tear if you’re not careful.
Fiberglass roofs are the tough guys—resistant to impacts and less likely to puncture than rubber. They don’t mind the sun as much either. The downside? They’re heavier and when they do crack, repairs can be a headache.
Aluminum roofs are the old-school option. They’re incredibly durable and can outlast most other materials, often going 30+ years. The catch? They’re heavy, noisy during rain, and can dent from hail or falling branches.
Crowned aluminum roofs feature a slight arch that helps with water runoff and adds structural strength. Smart design, but same drawbacks as flat aluminum.
Different Roofing Materials and Their Lifespans
The clock starts ticking on your RV roof the moment it leaves the factory. Here’s what you can expect:
| Material | Average Lifespan | Maintenance Level |
| EPDM Rubber | 10-12 years | Medium-High |
| TPO Rubber | 10-15 years | Medium |
| Fiberglass | 15-20 years | Low-Medium |
| Aluminum | 20-30+ years | Low |
EPDM (Ethylene Propylene Diene Monomer) rubber roofs were industry standard for years. They’re the black or white membrane you see on many RVs. They’re good, but they chalk over time (that white residue you see running down the sides after rain) and need regular cleaning and treatment.
TPO (Thermoplastic Polyolefin) is the newer kid on the block. It’s more resistant to UV damage, tears less easily, and generally needs less babysitting than EPDM. If you’re buying new, this is what you want.
Fiberglass doesn’t degrade like rubber, but it can develop hairline cracks over time that lead to sneaky leaks if not caught early.
Aluminum is the marathon runner of RV roofing. It just keeps going. The seams need attention, but the material itself rarely fails.
How Roof Design Impacts Maintenance Needs
The shape of your roof matters almost as much as what it’s made of.
Flat roofs are easier to walk on and inspect, but they’re water collectors. Any little depression becomes a puddle, and standing water is the enemy. You’ll need to check them more often and be diligent about keeping drains clear.
Crowned (slightly arched) roofs naturally shed water and snow—a huge plus. But that curve makes them trickier to walk on, and you might miss damage that’s not right in your line of sight.
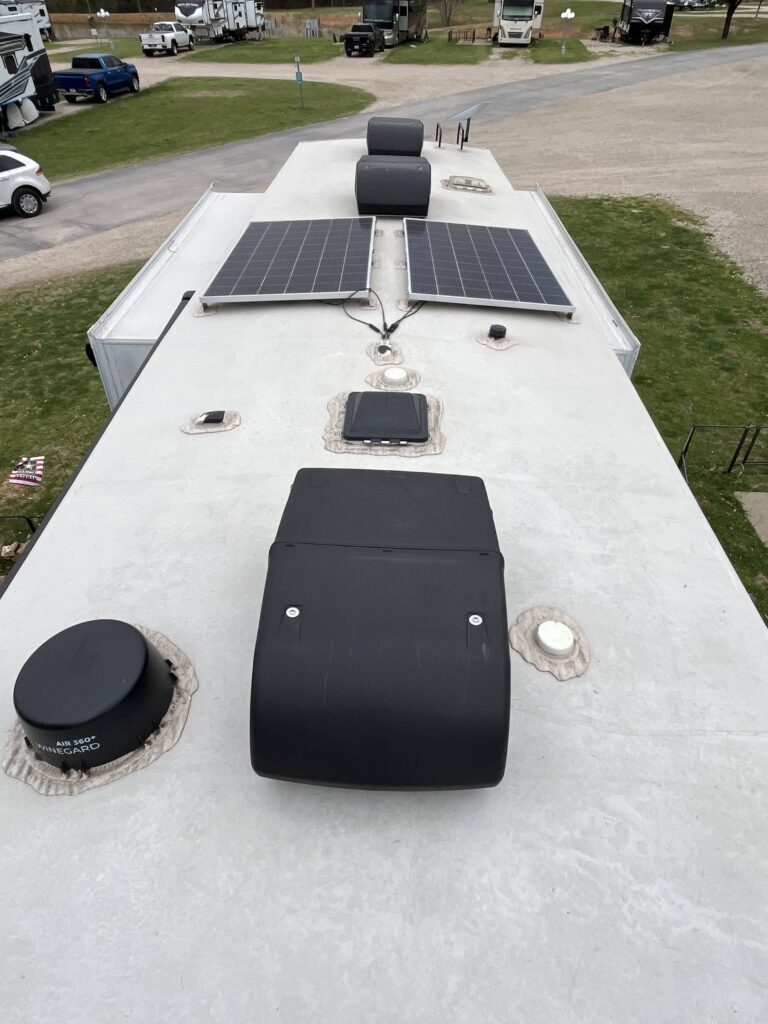
Slide-out roofs create additional seams and potential leak points. Each slide needs its own maintenance routine.
The number of roof penetrations (vents, AC units, antennas) also affects your maintenance schedule. Each one is a potential leak waiting to happen, so more penetrations mean more potential trouble spots to check.
Identifying Your Specific RV Roof Type
Not sure what’s over your head? Here’s how to figure it out:
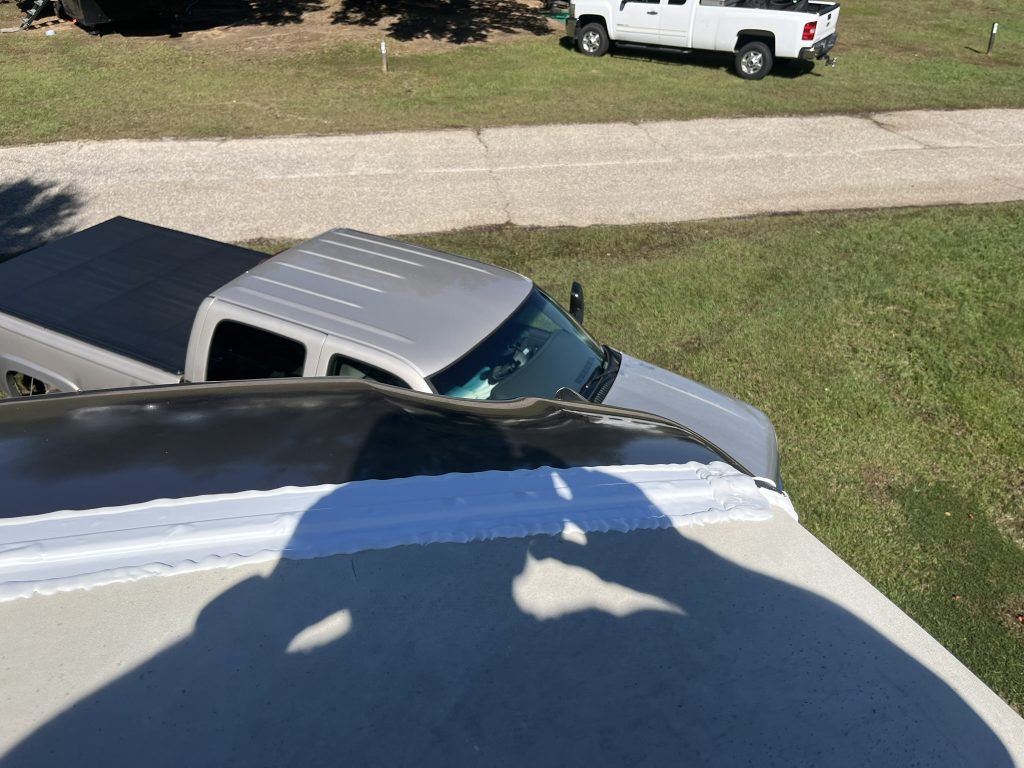
Climb up there (safely, please) and look. EPDM rubber is usually black or white and feels like a thick rubber membrane. It has a slightly tacky feel when clean.
TPO is similar but typically bright white and feels more plastic-like than EPDM. It has a slicker surface.
Fiberglass has a hard, smooth surface that feels like your bathtub or boat hull. It’s often slightly textured for traction.
Aluminum is, well, metal. It’s usually white (painted) or silver and makes a distinctive sound when you tap it or when rain hits it.
Still not sure? Check your owner’s manual or call the manufacturer with your VIN number. They can tell you exactly what you’re working with.
Knowing your roof type isn’t just trivia—it determines what products you should use for maintenance, how often you need to inspect, and what warning signs to watch for. The wrong cleaning product on the wrong roof can cause serious damage, so this homework pays off.
Why Regular Roof Inspections Save You Thousands
A. Preventing costly water damage to interior components
Think about it – your RV roof is literally the umbrella protecting everything you own inside your traveling home. When that protective barrier fails, water doesn’t just drip in… it destroys.
I’ve seen it happen to countless RV owners. A tiny, barely noticeable crack leads to moisture seeping into ceiling panels, then walls, then electrical systems. Before you know it, you’re looking at a $5,000+ repair bill that could have been prevented with an inspection.
Water damage is sneaky. It starts small – maybe just a soft spot in your ceiling or a slight discoloration. By the time you notice that musty smell, the damage has already spread like wildfire behind your walls, attacking insulation, wood framing, and electrical components.
Most shocking? Insurance often won’t cover this type of damage because it’s considered “preventable maintenance.”
B. Extending the overall lifespan of your RV
Your RV is a major investment. Depending on your model, you’ve dropped anywhere from $50,000 to over $300,000. So why wouldn’t you protect that investment?
Regular roof inspections aren’t just about finding problems – they’re about adding years to your RV’s life. Every time you climb up there and recaulk a seam or patch a small crack, you’re buying more time.
RVs with regularly maintained roofs typically last 5-10 years longer than neglected ones. That’s potentially another decade of memories and adventures instead of premature replacement costs.
C. Maintaining resale value through documented maintenance
Want to know a secret about selling your RV someday? Buyers will pay a premium for maintenance records.
When you keep a simple log of your roof inspections and repairs, you’re creating documented proof that your RV has been cared for properly. This documentation can literally add thousands to your resale value.
Smart RV owners keep a simple maintenance binder with dated photos of their roof inspections. When selling time comes, this binder becomes your secret weapon to command top dollar.
I’ve seen identical RV models sell for $10,000 difference simply because one owner could prove they performed regular roof maintenance and the other couldn’t.
D. Avoiding emergency repairs during travel seasons
Nothing ruins a vacation faster than your roof suddenly failing in the middle of nowhere.
Emergency RV repairs while traveling are:
- Significantly more expensive (often 2-3x normal cost)
- Potentially impossible to schedule during peak seasons
- Guaranteed to destroy your carefully planned itinerary
The worst part? Most emergency roof repairs happen during rainy seasons when you need that roof most!
Regular inspections help you catch and address issues during your convenient downtime, not when you’re supposed to be enjoying that lake trip you’ve planned for months.
E. Protecting warranties through proper care
Many RV owners don’t realize this, but most extended warranties and even some manufacturer warranties include fine print requiring regular maintenance.
Skip those roof inspections, and you might be accidentally voiding your coverage.
Most warranty companies require proof of annual inspections if you’re filing a claim related to water damage. Without documentation, they can (and often do) deny claims worth thousands.
Even more frustrating – some warranties specify professional inspections, while others allow DIY documentation. Know your warranty requirements and follow them religiously.
Your roof inspection schedule isn’t just maintenance – it’s protection for your warranty coverage that you’ve already paid for.
Critical Signs of Roof Damage to Watch For
Early warning indicators that require immediate attention
Your RV roof is practically begging you to pay attention to it before small issues morph into wallet-draining disasters. Trust me, I’ve seen it happen too many times.
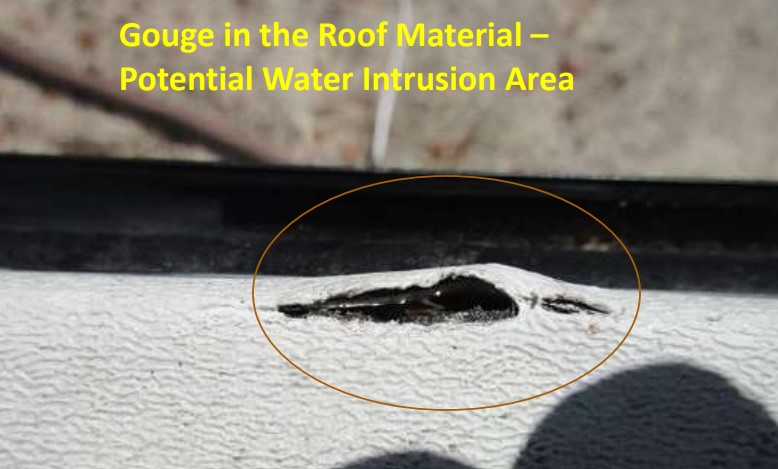
Bubbling or blistering on your roof surface? That’s water already trapped underneath. Don’t just drive on hoping it’ll magically disappear. It won’t. Those bubbles will grow, and before you know it, you’re looking at extensive structural damage.
Soft spots are another red flag you can’t ignore. When you’re up there doing your inspection (you are doing those regularly, right?), press gently across the surface. If any area gives way under light pressure, you’ve got water infiltration weakening the decking below.
Discoloration isn’t just an aesthetic issue. Those yellowish or brownish stains on your interior ceiling? They’re screaming “water intrusion!” Even the smallest stain means water has already breached your roof and is making itself comfortable in your RV.
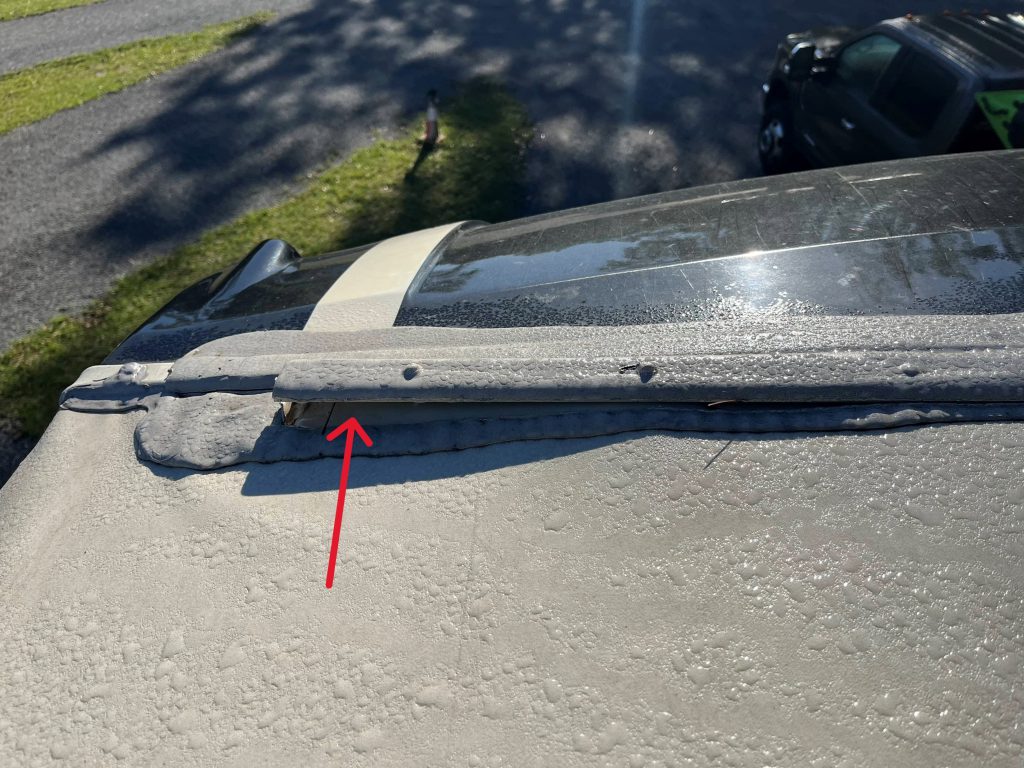
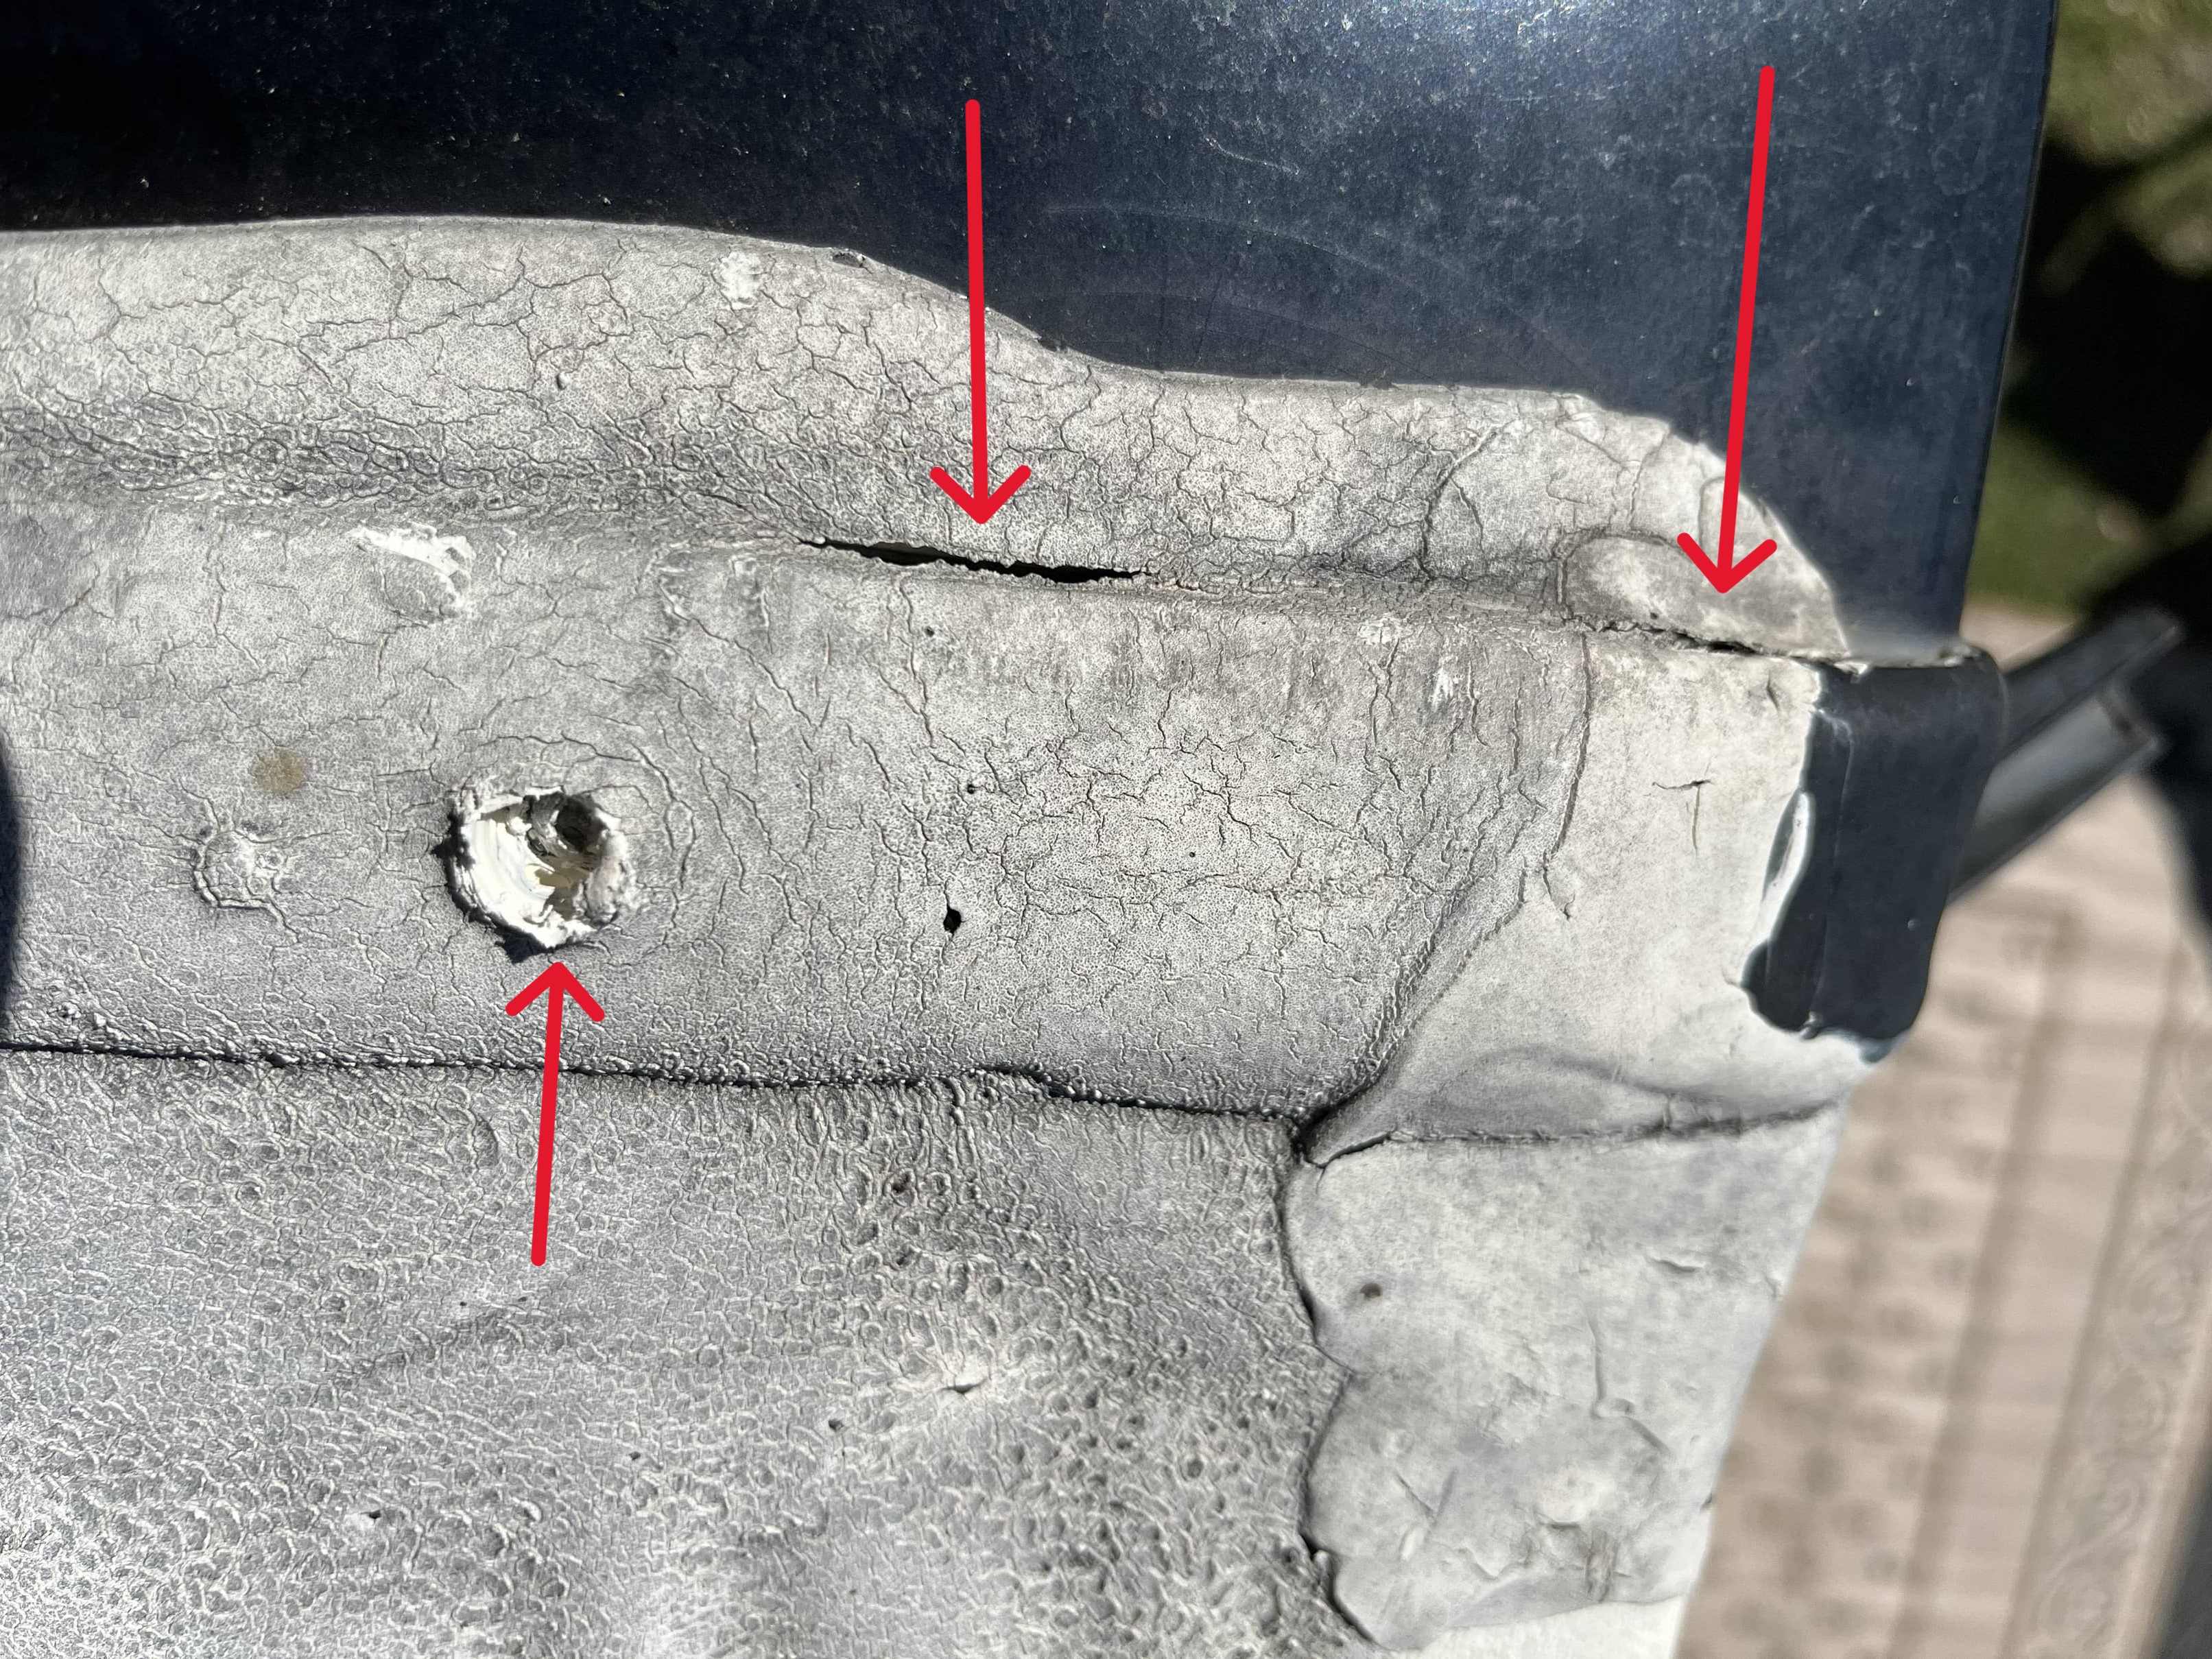
Cracking rubber roofs is serious business. Those hairline cracks might seem harmless now, but they’re doorways for moisture. Once water gets through, it’ll have a field day with your insulation and wooden structures.
Sagging sections are practically waving red flags at you. If your roof has started to dip anywhere, water is pooling there and adding weight to an already compromised structure. This requires immediate professional attention.
Seasonal damage patterns to monitor
Winter and summer are the one-two punch that can knock out your RV roof if you’re not careful.
Winter throws freezing temperatures at your roof, causing materials to contract. Then any moisture that’s sneaked in expands when it freezes, creating or widening cracks. The weight of snow buildup can also stress your roof structure beyond its limits. After heavy snowfall, grab that extendable brush and clear it off – your roof isn’t designed to handle that extra weight for long periods.
Summer brings its own challenges with scorching UV rays that brutalize rubber and fiberglass roofs. The constant heating and cooling cycle as temperatures fluctuate between day and night causes materials to expand and contract repeatedly, weakening seals and creating openings for water.
Spring and fall aren’t innocent either. They bring pollen, leaves, and debris that love to clog drainage channels. When water can’t flow off your roof properly, it sits there, plotting its invasion into your RV’s interior.
Trees become seasonal villains too. In fall, those beautiful changing leaves end up on your roof, trap moisture, and decompose, potentially damaging your roofing material. In spring and summer, overhanging branches scrape across your roof with every breeze, slowly wearing away protective coatings.
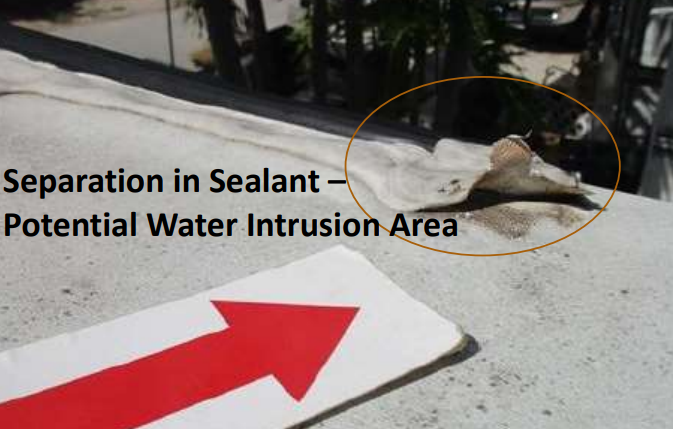
How to spot sealant deterioration before leaks occur
Sealant is your first line of defense, but it doesn’t last forever. Catching problems early saves you from discovering indoor waterfalls during your next camping trip.
The edges tell the story first. Run your finger along the sealant edges where roof meets fixtures – around vents, antennas, skylights, and AC units. If it’s pulling away or feels brittle instead of flexible, water is already planning its attack.
Color changes are your early warning system. Fresh sealant has a consistent color. When you start seeing yellowing, graying, or sections that look different from others, deterioration has begun. Different colored sections mean uneven aging – a sign of partial repairs or areas getting more weather exposure.
Cracking is the point of no return. Once your sealant develops cracks, it’s failed at its one job – keeping water out. Even hairline cracks can allow surprising amounts of water through.
The chalky residue test never lies. Rub your finger across the sealant. If a white, powdery substance comes off, that’s called chalking. It means UV exposure has broken down the chemicals in your sealant, and replacement time has arrived.
Don’t forget to check the less obvious spots like roof seams and edges. These areas often get overlooked but are common entry points for water when sealant fails.


Establishing an Effective Roof Inspection Schedule
Seasonal Inspection Guidelines for Different Climates
Your RV roof takes a beating from Mother Nature all year round. But what works for desert dwellers won’t cut it for those camping in the Pacific Northwest.
Hot, Dry Climates (Southwest, Desert Regions)
- Inspect every 2-3 months
- Focus on checking for UV damage, cracking, and dried-out sealants
- Early morning inspections before the roof gets too hot to touch
- Look for chalking on rubber roofs—that white residue means your roof is crying for help
Cold, Snowy Areas (Northeast, Midwest)
- Monthly checks during winter if stored outside
- Immediate inspection after heavy snow (never let more than 2″ accumulate)
- Spring inspection crucial to spot damage from freeze/thaw cycles
- Check seams where ice dams might have formed
Humid, Rainy Regions (Southeast, Northwest)
- Monthly inspections year-round
- After any multi-day rain event, climb up there
- Pay special attention to signs of mold, algae growth
- Gentle cleaning every 3 months to prevent buildup
Pre-trip and Post-trip Inspection Checklists
Nobody wants to discover a leak on day two of their dream vacation. A quick 15-minute check before and after trips can save thousands in repairs.
Pre-Trip Checklist:
- Walk the roof edge to edge (wearing soft-soled shoes)
- Check all sealant points around vents, antennas, and AC units
- Look for any new cracks, bubbles, or separation
- Test roof accessories (antenna, satellite, etc.)
- Clear any debris that collected since last use
- Confirm roof ladder is secure
Post-Trip Checklist:
- Remove all tree debris, leaves, and branches
- Check for new scratches from low-hanging branches
- Inspect for any storm damage that occurred during your trip
- Note any areas that might need attention before next use
- Clean bird droppings immediately (they’re acidic!)
- Look for signs where tree sap may have fallen
Weather Event Inspections
That unexpected hailstorm or 100-degree heatwave? They’re basically sending your RV roof an invitation to fail.
After a hailstorm, grab a ladder and look for dimpling, especially on fiberglass or aluminum roofs. Even small dents can compromise the roof’s integrity and lead to future leaks. Document with photos for insurance.
High winds love to lift edges of membrane roofs and loosen sealants. Check every corner and edge after windy conditions exceed 40 mph.
Heavy rain requires interior checks too. Run your hand along ceiling seams feeling for dampness, and check window frames where water often sneaks in first.
Extreme heat (95°+ for multiple days) accelerates aging of all roof materials. After heat waves, check for new cracks in sealants and any bubbling in membrane materials.
Professional vs. DIY Inspection Recommendations
Some roof checks you can handle yourself. Others? Leave them to the pros who do this daily.
DIY-Friendly Inspections:
- Visual surface checks for obvious damage
- Sealant inspections around vents and fixtures
- Basic cleaning and debris removal
- Testing for soft spots by walking carefully on the roof
When to Call the Professionals:
- Annual comprehensive inspection (especially before warranty expires)
- When you notice interior water stains but can’t find the source
- After significant weather events like hail or tornado-level winds
- If your roof is over 5 years old and has never been professionally inspected
- When buying a used RV (worth every penny of the inspection fee)
Professional inspections typically cost $150-300 but catch problems when they’re $300 fixes, not $3,000 nightmares. Looking for a mobile RV tech in your area https://rvhelp.com/ref/dca5aa0b
Remember, your RV roof is protecting everything underneath it. Skipping inspections isn’t saving money—it’s just postponing a bigger bill.
Tools and Techniques for Thorough DIY Roof Inspections
Essential tools for safe and effective inspections
You might think checking your RV roof is just a matter of climbing up there and looking around. Not so fast! Without the right tools, you’re setting yourself up for trouble – either missing critical issues or risking your own safety.
Here’s what you need in your inspection toolkit:
- Extension ladder with stabilizers – don’t use that wobbly stepladder!
- Non-slip shoes with good traction – one slip on a dewy roof can send you to the hospital
- Headlamp or flashlight – because shadows hide the worst problems
- Smartphone camera – to document everything you find
- Soft-bristle brush – for clearing debris without scratching the roof
- Small plastic putty knife – perfect for checking sealant without causing damage
- Measuring tape – to document the size and location of issues
- Chalk – for marking problem areas
- Safety harness – especially for larger RVs or if you’re working alone
Step-by-step inspection process from ground to rooftop
The smart RV owner starts their inspection before ever climbing that ladder.
Ground-level assessment:
- Walk around your RV looking for stains or water marks on the exterior walls
- Check interior ceilings and walls for discoloration or soft spots
- Look for sagging areas along the roofline
Ladder assessment:
- Position your ladder on stable ground and at the proper angle
- Look across the roof surface from the ladder to spot obvious issues
- Check roof edges and seams first – they’re trouble spots
On the roof:
- Step only on structural areas (above cabinets/walls)
- Work in a systematic pattern – front to back, side to side
- Pay special attention to areas around vents, antennas, AC units and skylights
- Press gently on sealant to check for cracking or separation
- Clear away leaves and debris that trap moisture
Documentation methods to track changes over time
The biggest mistake RV owners make? Not keeping records. Your memory isn’t as reliable as you think.
Create a simple roof maintenance log with:
- Dated photos of potential problem areas
- Measurements and locations of existing repairs
- Notes on sealant condition
- Records of when you last replaced or touched up caulking
- Weather conditions during each inspection
I recommend creating a digital folder organized by date, with subfolders for each section of your roof. This makes comparing changes over time incredibly easy.
A physical notebook works too – just be consistent about taking detailed notes with clear reference points. “Small crack near front AC unit” isn’t helpful six months later when you’re trying to remember exactly where it was.
Using technology for enhanced inspections
Your smartphone is actually your most powerful inspection tool. Here’s how to level up your inspection game:
Smartphone camera tricks:
- Use panoramic mode to capture the entire roof in one shot
- Shoot video as you narrate your findings
- Use time-lapse photos of the same areas over multiple inspections
Addressing Common Roof Issues Before They Worsen
Quick fixes for minor sealant failures
Ever noticed those tiny cracks in your RV roof sealant? They might seem harmless now, but give them a few rainy days and you’ll be dealing with interior water damage that’ll make your wallet cry.
The good news? Most minor sealant issues can be fixed in an afternoon with minimal tools. First, clean the area thoroughly—dirt is the enemy of good adhesion. Then apply a compatible sealant (self-leveling for flat areas, non-sag for vertical surfaces). Pro tip: don’t cheap out here. A $20 tube of quality sealant beats thousands in water damage repairs.
For those pesky lap sealant cracks around vents and fixtures, you don’t always need to remove the old stuff. In many cases, you can apply new sealant right over the old layer after proper cleaning. Just make sure it’s completely dry before application.
When to replace versus repair roof components
The repair-or-replace question keeps many RV owners up at night. Here’s my straightforward take:
Small punctures and tears under 6 inches? Repair.
Multiple leaks in the same area? Replace that section.
Widespread membrane deterioration? Time for a full replacement.
The age factor matters too. If your rubber roof is pushing 15+ years, patches become increasingly temporary.
Cost considerations typically break down like this:
| Repair Type | DIY Cost | Professional Cost | Lifespan |
| Patch/Seal | $50-150 | $200-500 | 1-3 years |
| Section Replace | $300-700 | $800-1,500 | 3-7 years |
| Full Replacement | $1,500+ | $3,000-13,000 | 10-20 years |
Trust your inspection findings, not your budget. That “expensive” repair now is actually the budget option compared to what you’ll pay after water damage spreads.
Managing superficial damage before it compromises integrity
Those scuffs, scratches, and chalking on your RV roof? They’re not just cosmetic issues—they’re the first stage of serious damage.
Chalking on EPDM rubber roofs is actually the protective top layer breaking down. Once you notice excessive chalking, it’s time to apply a roof treatment specifically designed for your roof material. This simple step can add years to your roof’s life.
For minor scratches that haven’t penetrated the membrane, a compatible roof coating can provide that crucial UV protection. But here’s the catch—you need to know your roof material:
TPO and fiberglass roofs need different treatments than EPDM. Using the wrong product can actually accelerate damage.
Temporary solutions for emergency situations
Nothing says “adventure” quite like discovering a roof leak during a rainstorm three hours from the nearest repair shop.
For those panic moments, keep these emergency fixes in your RV toolkit:
EternaBond tape is practically magic for temporary repairs. This stuff will stick to almost any surface, even when it’s wet. Cut a piece about 2 inches larger than your damage area on all sides.
No specialized tape? A tarp secured with bungee cords (not screws!) can get you through the weekend. Just make sure it’s stretched tight to prevent water pooling.
Remember though—emergency fixes are like spare tires. They’ll get you to safety, but they’re not meant for the long haul. Once you’re back to civilization, get that proper repair scheduled before your temporary fix fails.
Working with Professionals for Major Roof Concerns
Finding qualified RV roof specialists
When your RV roof starts showing serious trouble signs, you need pros who actually know what they’re doing.
Not every mechanic or general contractor understands the unique challenges of RV roofs. Look for specialists with specific RV roof credentials and check their online reviews—particularly from full-timers who really put their rigs through the paces.
The best specialists typically:
- Have certification from a trade school
- Carry specialized insurance for recreational vehicles
- Can show you a portfolio of similar roof projects
- Belong to RV industry associations
Don’t just call the first place that pops up on Google. Ask fellow RV owners at campgrounds or in online forums who they trust. The RV community is incredibly generous with recommendations when it comes to good service providers.
What to expect during professional inspections
A proper professional inspection isn’t a quick glance and an estimate.
When you bring your rig in, the technician should perform a comprehensive assessment including:
- Climbing onto the roof (safely) to examine every inch
- Checking all seals, vents, AC units and attachments
- Testing for soft spots that indicate underlying damage
- Using moisture meters to detect hidden water damage
- Examining interior ceiling for stains or warping
Good inspectors document everything with photos and will walk you through their findings. They’ll point out immediate concerns versus maintenance items that can wait.
Understanding repair quotes and warranties
RV roof repairs aren’t cheap, but they should be transparent.
A legitimate quote breaks down:
- Materials (type and quantity)
- Labor hours with specific tasks
- Parts replacement costs
- Warranty terms
When replacement becomes more economical than repairs
Sometimes fixing an old roof just doesn’t make financial sense.
If your repair estimate exceeds 50% of replacement cost, it’s time to seriously consider starting fresh. Other signs it’s time for full replacement:
- Multiple leaks in different areas
- Significant structural damage to the roof deck
- Repeated repairs to the same areas
- Your RV’s roof is over 15 years old with original materials
Full replacement isn’t just about stopping leaks—it’s an investment in your RV’s longevity and resale value. A new roof with modern materials often provides better insulation, lighter weight, and longer durability than what came from the factory, especially on older rigs.
Your RV roof is the first line of defense against the elements, and its proper maintenance is non-negotiable for any serious RV owner. By understanding the materials that make up your roof, implementing regular inspection schedules, and knowing the warning signs of potential damage, you can prevent minor issues from developing into costly repairs. Whether you’re conducting DIY inspections with the right tools or knowing when to call in professionals for more complex concerns, proactive roof care is an investment in your RV’s longevity.
Remember, the cost of prevention is always less than the price of repair. Make roof inspections a priority in your RV maintenance routine, and you’ll enjoy worry-free travels for years to come. Your RV is more than just a vehicle—it’s your home on wheels, and protecting it starts at the top.
Lasting Memories Mobile RV Services is at Keystone Heights RV Resort in Florida. We service Keystone Heights, Bradford & Clay County Florida and the surrounding areas. Schedule your tank cleaning, repair and maintenance appointment now.